Showing posts with label Sally Hansen. Show all posts

Tuesday, September 30, 2014

PBBC September Challenge - Black & White

Hello lovies!

Back again with my current NOTD :) I am participating in the Proud Beauty Bloggers of Color's Monthly Challenge and this month's theme is Black & White!  But because I have been swamped the last couple of weeks with swatching and getting the giveaway put together, I really haven't had time to sit and get creative for this challenge.  So... instead... I "cheated" and used a set of Sally Hansen's nail wraps I recently bought...


 Color Used: Sally Hansen Salon Effects - 235 Check, Please!

I seriously love nail wraps.  They're very easy to apply (after a very short learning curve) and are especially convenient when you're in a pinch!


I wasn't sure how I was going to like the checkered look; I was afraid it was going to be too busy.  What I really wanted was the houndstooth pattern, but I haven't seen that set in a while.  Either way i am pleased with how they turned out :)

I feel like I should be waving down racers in NASCAR lol.


Please be sure to check out the other ladies that participated in this challenge :)


Until next time!

Stef <3

Sunday, April 20, 2014

Lilacs for Easter

Hello dearies!

I hope you all had a wonderful Easter!  I spent that day singing with friends and eating with family; all is well with the world ;)  I decided to forgo the eggs and bunnies this year and just do a simple scene of a lilac field...

 Colors: Mentality - Elizabeth, Sinful Colors Nail Art - Simple but Fun, Sally Hansen - Green with Envy, China Glaze - What a Pansy

I was inspired but an adorable mani I saw by @just1nail on IG.  I thought it was just the thing I was looking for!  I started with 2 coats of Mentality's Elizabeth, which actually is a stunning shimmery pale-pink that dies to a perfect matte finish.  It's one of my faves!


I then applied 2 shades of green with a striping brush for my grass.  Last, I added some purple dotting for my lilac flowers.  Really simple :)

*Sigh* I just love Spring manicures!


Today acutally marks 2 years of blogging for me (yippee!).  be sure to check back in a couple of hours for a "surprise" *hint hint*...

Until next time!

Stef <3

Monday, April 14, 2014

Speckled Spring Eggs

Hello dolls!

Long time, no see!  I hope all is well in the nail blog neighborhood ;)  Today I have some simple nail art that I did to get into the full swing of Spring...


Colors Used: Sally Hansen (Insta-Dri) - Blue Away, Julep - Carrie and Blake, Sally Hansen (Xtreme Wear) - Lacey Lilac and Mint Sorbet, Sinful Colors - Nirvana

I love love love doing speckled skittle mani's!  It's easy nail art that's cheerful and fun :D


I started with my mix of pastel colors as my base.  I then added a smattering of brown dots using a small dotting tool.  Lastly I topped it with Mentality Polish's matte top coat (a new favorite!)...

Super easy!


As I mentioned last night on Instagram, life has just been really busy so I had to put blogging on the back burner for a bit.  My plan is to have scheduled posts from here on out; I'm hoping I can keep with it lol.

Until next time!

Stef <3

Thursday, March 13, 2014

I'm Feelin' Cheesy

Hello dolls,

Today I decided to be adventurous and try out s mani that I saw from the always awesome Christabell Nails!  I saw her mani on IG and she had mentioned also having a video tutorial so I figured it was worth a shot haha...

 Colors Used: Sally Hansen - Lightening, OPI - The "It" Color, Julep - Blake

I friggin' love the way this turned out!  I just think it's super cute :)


I followed Christabell's easy-to-follow instructions and it really was a cinch!  I top coated with my new favorite matte topper from Mentality.  They seriously make the best matte polishes... ever... for reals.

Eep!

To find out how this look is achieved, check out the video link above!  I hope you all have a fabulous day :D

Until next time!

Stef <3

Wednesday, January 29, 2014

Twin Post - Absrtact Art with My Adventures in Nail Art

Hello lovelies!

Today's post is my first ever "twin manicure"!  I recently joined a twin mani Facebook group where I got paired with the lovely Gemma of My Adventures in Nail Art.  We were assigned an abstract pattern and through our correspondences, decided on bright primary colors along with squares and dots.  Gemma described to me her yellow base with red and blue squares and green dots and I thought it sounded fabulous so here's what I came up with...

 Colors Used: Sally Hansen - Butter-fly Stroke, Sinful Colors - Ruby Ruby, Love & Beauty - Bright Cobalt, Essie - Mojito Madness

I like the playfulness of this look.  It's a very whimsical combination of colors and patterns.  Gemma knocked it out of the park with this concept!


 I started with 2 coats of Butter-fly Stroke.  I then used a striping brush to free-hand my squares.  Last, I used a dotting tool to place random green spots on my design.  Easy peasy!


Be sure to check out Gemma's twin mani that 's posted on her blog!

Until next time!

Stef <3

Monday, November 4, 2013

Nailed Kit Review

Hello, lovelies!

Yikes... I can't believe it's been a week!  I'm so sorry, I've been a little busy in life.  Then I took advantage of the weekend to just relax and have a good time with freinds and family.  Impromptu blog vaca I guess lol.  But I'm back and have so much to share with you this week.  Let's get started!

Today I have a fun DIY nail kit to show you (*disclaimer)...

  
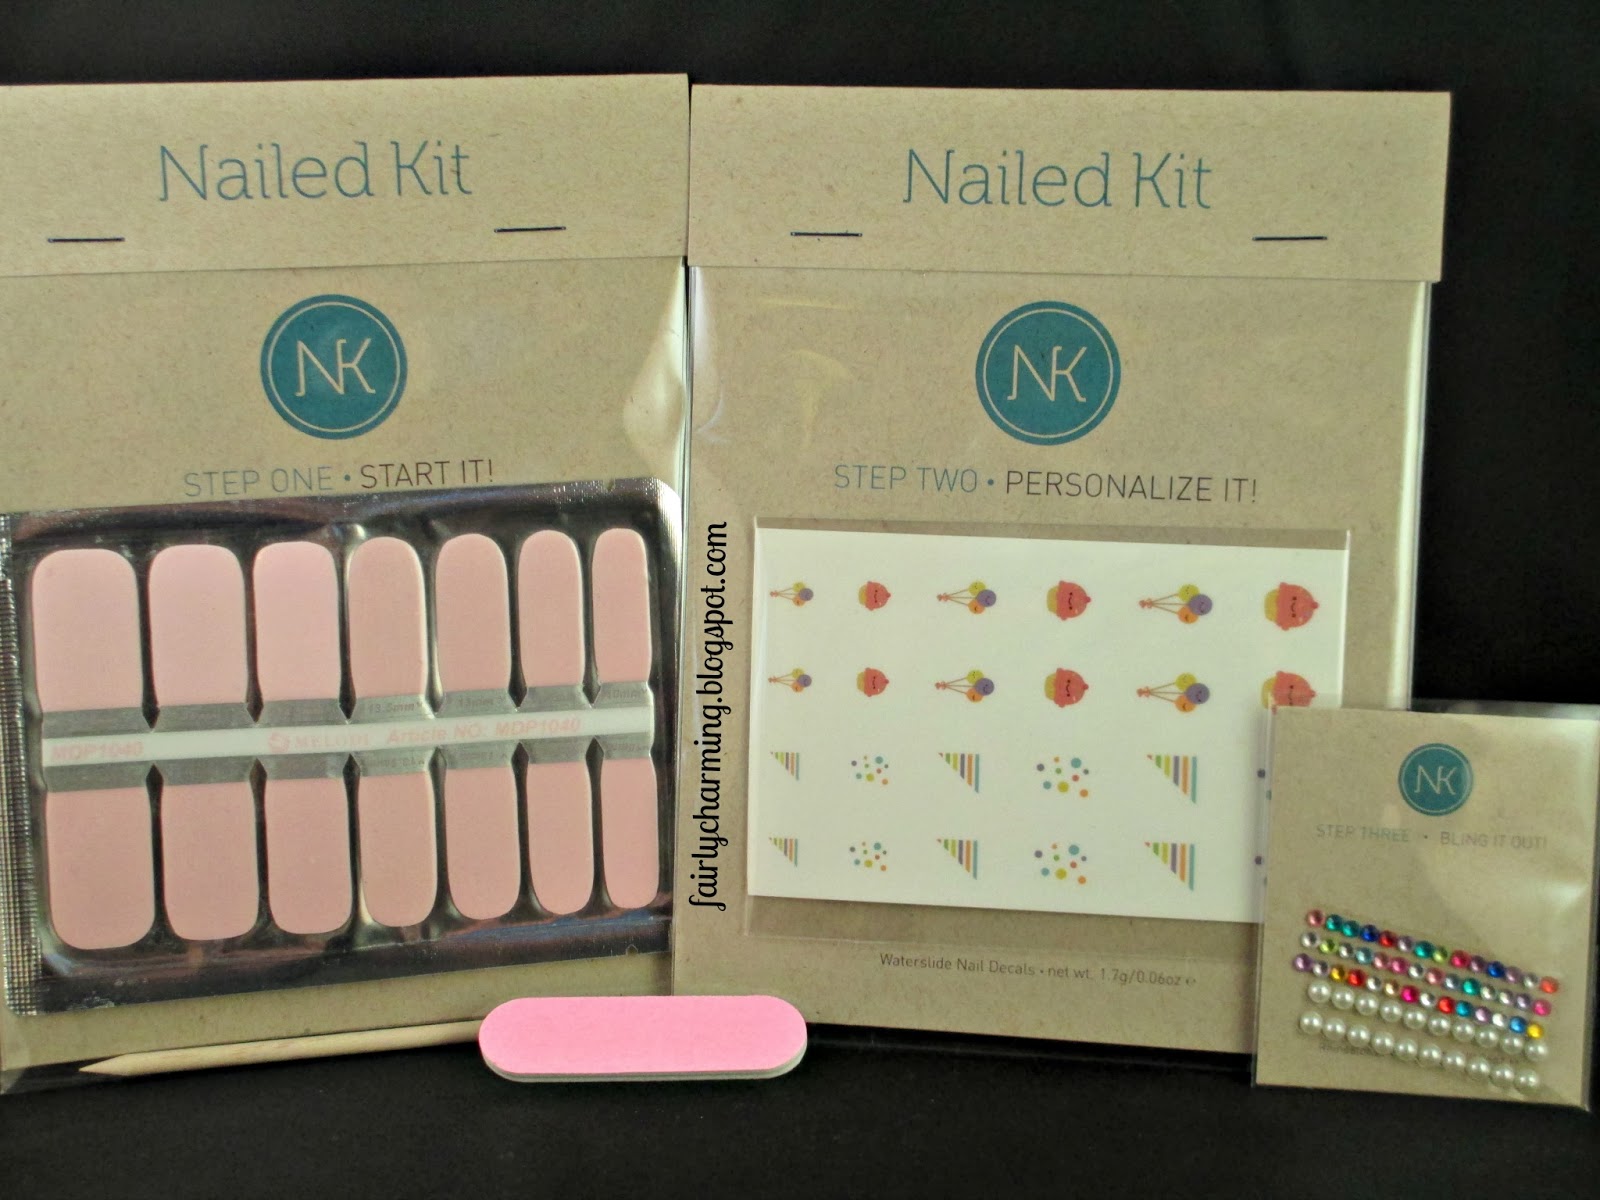
Nailed Kit Is just what it sounds like... A nail art kit!  It includes all of the materials one might need to create some fun/fabulous/adorable nail art.  There are quite a few styles to choose from, but I decided to go with the Cupcake Birthday Kit...

Nailed Kit, DIY nail art, subscription box, birthday, cupcake, all in one, nails, nail polish. nail art, nail design, mani

Inside the kit you will find nail polish strips, water decals, rhinestone/studs, an emery board and an orange stick.  Each packaged item has instructions on the back for application.  It's pretty fool proof... well, excpet for this fool lol.
 
Nailed Kit, DIY nail art, subscription box, birthday, cupcake, all in one, nails, nail polish. nail art, nail design, mani

The instructions for the nail strips said to stretch them over your nails.  Well, these bad boys (girls?) are really pliable and I actually LOVED the way that they looked.  Very much as if I had polished my the nails myself.  But... I was a little over zealous with the stretching and a few minutes later when I was ready to take some pictures, the strips shrunk back a bit and my nail line was peaking thru at the tips.  I'm a big dope!


So I pulled out the closest polish shade I could find (Color Club Endless) and all was right with the world lol.  The other polish pictured, for those who are curious, is Spellbound Nails Upelkuchen (birthday cake batter, I thought it was fitting haha).


I did a second mani I wanted to show the versatility of this box.  Polishes used here were Jesse's Girl Sprink Break, Sally Hansen Blue-Away and Lush Lacquer Clowning Around.  The one recommendation I will make when using this kit... the decals are pretty sheer so a really light base (I chose white) will help the color to pop.


There are so many options with this kit and this company.  You want to throw a nail party?  Awesome!  Get some food and drink and order a few kits for your gal pals... party hardy!  Or maybe it's a baby shower?  A bachelorette party?  They've got you covered.  You can also just buy a kit for yourself and create multiple manicures.  Aaaaand if you just want the cute little decals... you can do that too!  If you really love it, there are subscriptions boxes available as well.  So many choices!!  Nailed Kit is a really great option for anyone who is wanting to take the plunge into nail art :)

You can find out more about Nailed Kit via their website.


What do you guys think about this kind of box?  Let me know in the comments below :)

Until next time!

Stef <3

* This product was provided to me for review.  I received no payment or other compensation for the review of this product.  The opinions stated here are completely my own.  The contents of this review are based on my direct experience with this product.

Monday, October 7, 2013

Blue... You've Stolen My Heart!

 Hiya lovelies!

I've got a quick post for you today.  It features a skittle mani that I did using my new fave polish color, blue :D


Sally Hansen Laughie Taffy, Kleancolor Light Teal, blue, skittle, skittlette, ombre, gradient, cross stitch, stripes, textured, nails, nail art, nail design, mani

 Colors Used:  Sinful Colors- Midnight Blue, Orly - Dazzle, Sephora by OPI - Meet Me At The Disco, Kleancolor - Pastel teal, Sally Hansen - Laughie Taffy


You see, what had happened was... I needed an excuse to try out my newest SH Sugar Coat (Laughie Taffy).  I just love textured polishes and I'm trying my best to get one in each color of the rainbow lol.  Well, one thing led to another and I got a little carried away ;)  The cross-stitch is a new technique for me.  I haven't quite mastered it yet by I definitely plan to!  Haha...


Happy Monday!


I took time this weekend to just hang out with my hubby but I haven't forgotten about the Eiffel Tower tut.  I'll work on it tonight when I get home and have it up for you soon :)

Until next time!

Stef <3

Thursday, September 12, 2013

Sweet Sally

Hello, dearies!

I have a simple manicure to share with you today.  Surprisingly, as simple as this mani looks, it was a challenge that I took up.  I was determined to make this polish work for me...


Sally Hansen, Petal Pusher, Mint Sorbet, pink, nude, mint, polka dot, accent nail, simple, work appropriate, classy, classic, nails, nail art, nail design, mani
 Colors Used: Sally Hansen Insta Dri - Petal Pusher, Sally Hansen Extreme Wear - Mint Sorbet

I have had Petal Pusher in my collection for about 4 or 5 months now and half the bottle is already gone.  You're probably thinking, "Wow! She must really love that polish!".  Nope!  This polish is a pain in the rear-end to apply.  Not only is it thick, leaning towards goopy, it is also very streaky *sigh*.  But I am of the mindset that you can make any polish work, so work work work I did...


First and foremost I have to tell you that I have added polish thinner to my bottle of Petal Pusher to make it more manageable.  I've found that I've had to do it with the majority of the Insta Dri's that I own.

I started with one thin, streaky coat on all of my nails.  I then went back and added a second thicker coat to add coverage/opaqueness.  I then went back over them again with a third thin coat to even out the streaks and color.  With a large dotting tool I added polka dots to my ring finger using Mint Sorbet.  I then top coated with Color Club Clear.


I have to say that I do not hate this polish.  I love the delicate color and  I figured out how to make it work for me so I wouldn't have to throw it in the garbage bin haha.  

I'm curious to know how you ladies have faired with the Insta Dri line of polishes?  Love it or hate it?

Until next time!

Stef <3

Friday, August 23, 2013

Luck Schmuck!

Hiya dolls!

I'm feeling like a bit of a Grinch today.  I'm very glad that it's Friday and I'm very very glad that I get to take the day off of work.  But it's work that has made me slightly cranky.  Not just my school job but my music jobs as well.  Bah-humbug!


Revlon Posh, Color Club Gingerbread, Sally Hansen Green With Envy, nail crystals, nails, nail art, nail design, mani
 Colors Used: Revlon - Posh, Sally Hansen - Green With Envy, Color Club - Gingerbread

They say that green is the color of luck (who are "they" anyway??).  I haven't felt very lucky while wearing this mani but it did last about 4 days, chip-free. Ok...I was a little lucky....


It's 2 coats for each color except Gingerbread, which was 3.  I applied the crystal while the polish was still wet and then topcotaed all of my nails with OPI RapiDry.


 Sometimes simple is nice right?

Happy Friday to you all!  I hope you have a fantabulous weekend :)

Until next time!

Stef <3

Sunday, August 18, 2013

Sunday's Are For Swatching!

Hello, lovelies!

Today I am launching a new segment on the blog.  I recently recieved an email from the logistics manager of my church choir (along with everyone else).  It basically reiterated our dress code policies on Sunday mornings and it stated that while we are allowed to wear nail polish it must be a "normal" color.  Wah wah wah.  So to keep myself from getting in trouble and to continue what used to be my "Church Mani" series, I'll be swatching!  There will be a swatch of my "normal" churchy polish and then a fun color to mix things up!  I may not be able to post every Sunday (brunch is a favorite of mine haha), but at least this way I can get thru my untried polishes quickly :D


Julep Annette, swatch, grey, gray, mushroom, taupe, nails, nail art, nail design, mani
Annette

First up is Annette!  Julep has described this beauty as a "light dove grey crème".  Personally, I think it looks more mushroom/taupe in color.  Either way I absolutely love it!  I received it in the most recent Julep Mystery Box that came out this month.  I didn't think it looked like anything special in the bottle but once I got it on.... I couldn't stop staring at it.  It's just so elegant and beautiful :)  This swatch is 2 coats with OPI RapiDry Top Coat.


Sally Hansen Peachy Breeze, Insta Dri, swatch, coral, pink, bright, nails, nail art, nail design, mani
Peachy Breeze

There ain't nothin' peachy about this one!  As with all  Insta-Dri's the formula is very thick, creamy and pigmented.  This polish is a bright coral that leans more towards a rosy-pink than orange.  This polish is the perfect "pick-me-up" color and it has been one of my faves for the last couple weeks.  This swatch is 2 coats with OPI RapiDry Top Coat.

Retail: $4.00 


Well, I hope you all have a very wonderful evening/night :)  If you have any suggestions how I can better my swatching posts, feel free to comment below...

Until next time!

Stef <3

Saturday, August 17, 2013

Musical Me

Good morning, dolls!

It's been almost a week since my last post and I have missed the community terribly!!  I have lots of blogs that I need to catch up on.  Just skimming thru my blog roll, it looks like you ladies have been busy busy busy haha :)

Well today's post is centered around a part of my life that I have never really expounded on in my blogging.  I have mentioned in passing that I am a singer.  I am currently sit on the board of (and sing in) a non-profit organization called the Paul Delgado Singers.  We are a semi-professional chamber choir that performs around Southern California.  I am also a contracted/paid singer at a church called Shepherd's Grove, formally the Crystal Cathedral.  My church produces the television show "The Hour of Power" and my church choir is often reffered to as "The Hour of Power Choir".  I have been singing and performing since around the age of 8 and since I'm going to be 28 next year.... let's just say I've been doing it a long time lol.  I'm also the director of 2 children's choirs at a private school (along with just having been promoted to Director of the schools childcare program).  All of this is a preface to the fact that I have never ever, not once, posted a musically themed mani.  Ever!


Music, musical, treble clef, black, white, glitter, Sally Hansen Glitz Girl, nails, nail art, nail design, mani
 Colors Used: Rimmel - Black Satin, Sally Hansen - Glitz Gal (Gem Crush), Daisy Nail Lacquer - White Diamond


I started with black on all of my nails except my ring finger, which got white.  Glitz Gal is on my middle finger and it was two coats over one coat of black.  I free handed the treble clef, which I see pretty much every day of my life lol.


After completing this mani, I remembered why I never did it.  Treble clefs are hard!!!  This took me far too long to do and I'm still not 100% pleased.  Bleh!

Thank you so much for sticking thru this rather-lengthy-for-me post.  It's nice to be able to share a little bit about my personal life.  It also helps bring to light my crazy schedule and why I sometimes go missing from the blog world for a week... like this week haha.  As always I truly do appreciate your support and I'm sorry I haven't been good about commenting back.  Know that I love love love your comments, they brighten my weariest of days :)

Until next time!

Stef <3

Tuesday, July 30, 2013

Like The Night Sky

Hello, darlings!

Quick post for you today :)  This mani was inspired by a sponging mani I did for my sister in-law and Nailasaurus' tutorial of her pastel galaxy nails (super cool!)...


Night sky, starry, Neverland, blue, sponge, sponging, marble, star bursts, nails, nail art, nail design, mani
Colors Used: Sally Hansen - Blue-Away, Love & Beauty - Bright Cobalt and Periwinkle, Daisy Nail Lacquer - White Diamond, China Glaze - Fairy Dust

My hubby told me that it looks like the night sky, hence the posts title.  A friend of mine told me that it made her think of Neverland which I also really loved :)


I started with 2 coats of Blue-Away and then sponged on Cobalt and Periwinkle.  I added one coat of Fairy Dust, followed Nailasaurus' instructions for star bursts and then topcoated.


Altho I feel like the star bursts could use some work, I really like the way this turned out :D

Has anyone tried out some new techniques recently?  I'm looking for a challenge ;)  I hope you all are having a fabulous week!

Until next time!

Stef <3

Thursday, July 25, 2013

Something Old & Something(s) New

Hello, dolls!

It's almost the weekend, get excited!!  The mani I have to share with you today is one that I did late Monday night.  I was super sleepy, but felt deserving of a pampering haha.  I pulled out an "untried" and used it with some new polishes that I bought in a recent haul...


Sally Hanses Mermaid's Tale, Savina Blur For You, Daisy Nail Lacquer White Diamond,navy blue, teal, turquoise, chevron, glitter, nails, nail art, nail design, mani
 Colors Used: Daisy Nail Lacquer - White Diamond, Savina - Blue For You, Sally Hansen - Mermaid's Tale

Can you tell which one is the SH?  Even tho navy blues are usually saved for Fall and Winter, I decided to rock it anyway.  I've had Mermaid's Tale since the begining of Spring and never tried it.  Which is a shame because it's so dang pretty!


 white Diamond and Blue For You are new buys.  I like white diamond because it's thick and opaque.  2 thin coats and it was good to go :)  Blue For You is interesting.  In these photos it leans towards blue, while on my phone's camera it looks very green.  In person... I'd say it looks like mint and turquoise had a gorgeous baby.  There is a down side *sigh*.  Like most Savina's that I've tried/own, this beauty is super streaky. I was a little surprised during application because it looks so thick and opaque on the brush (it was the deciding factor when I purchased it).  I did 3 thin-ish coats.

I used my handy dandy striping brush for the design on my ring finger (Julep mystery polish was used for the navy blue)...


Clean-up isn't great but I really liked the way these photographed!  Wandering what happened to my thumb shot?  I forgot that I hadn't photographed this mani and started my removal process lol.  Would have been a shame not to have gotten these ;)


I hope you all are having a fantabulous week!

Until next time!

Stef <3

Monday, July 22, 2013

If You Give A Girl A Strping Brush...

Hello dolls!

Late night post from em today (or early morning, depending on your global locale).  I should be going to bed but decided blogging would be a much better idea haha.  So, this mani is one I did last week out of sheer boredom...


Sally Hansen Blue-Away, Insta-Dri, Orly Dazzle, striping, striping brush, racing stripes, sky blue, baby blue, silver, black, nails, nail art, nail design, mani
 Colors Used: Sally Hansen - Blue-Away, Orly - Dazzle, Rimmel - Black Satin

Blue-Away is one of SH's Insta-Dri polishes.  Very thick/opaque and dries  with a nice glossy sheen.  I started with 2 coats as my base color.  Then only exception being my middle finger which received 2 coats of Dazzle.


I then just sort of went to town with my striping brush.  No rhyme or reason to it. I just painted with abandon and it was pretty fun lol.


Hmmm... I really wish I had something more interesting to add to this post.  I don't tho.  I'm very sorry.  I hope you all have a loverly night/morning :D

Until next time!

Stef <3