Showing posts with label Gold. Show all posts

Saturday, November 8, 2014

A Spotted Bordeaux

Hello dolls!

I hope you all are enjoying a fantabulous weekend!  I was so excited that it finally got cool enough to feel like Fall last weekend and today... we're back to 90 degree weather.  I'm so mad!!  but, I'm not going to let the weather keep me down.  For today's mani I have a simple nail art look inspired by my new favorite color for this season, wine/burgundy...

 Colors Used: Revlon Parfumerie - Bordeaux, Julep - Felicity
I know that nude is the it color for Fall for 2014, but forget that noise.  I need color!!  So I decided I need to pick my own color for the season and this is what I went with ;)


 I started with 2 coats of Bordeaux which, when dry, smells of deep berry yumminess.  I then topped it with Mentality's Matte top Coat.  Once it dried, I took a dotting tool and applied Felicity and that's it!

Fall has arrived, even if California refuses to accept it!!  :P


If I get more time to myself, I will put together a SAFS post., otherwise I will be back next week with some more nail art...

Until next time!

Stef <3

Wednesday, November 5, 2014

Simply Beautiful Review

*Disclosure

Hey dolls!

Today I have some swatches from a new indie on the scene, Simply Beautiful :)  I was approach by maker Ashanti about swatching some of the polishes from her new brand and I happily obliged!


Ashanti's favorite color is gold, so I have a few variations of gold to share with you along with some micro glitters and a topper.  Let's get started!

 Simply Beautiful - Golden Bronze

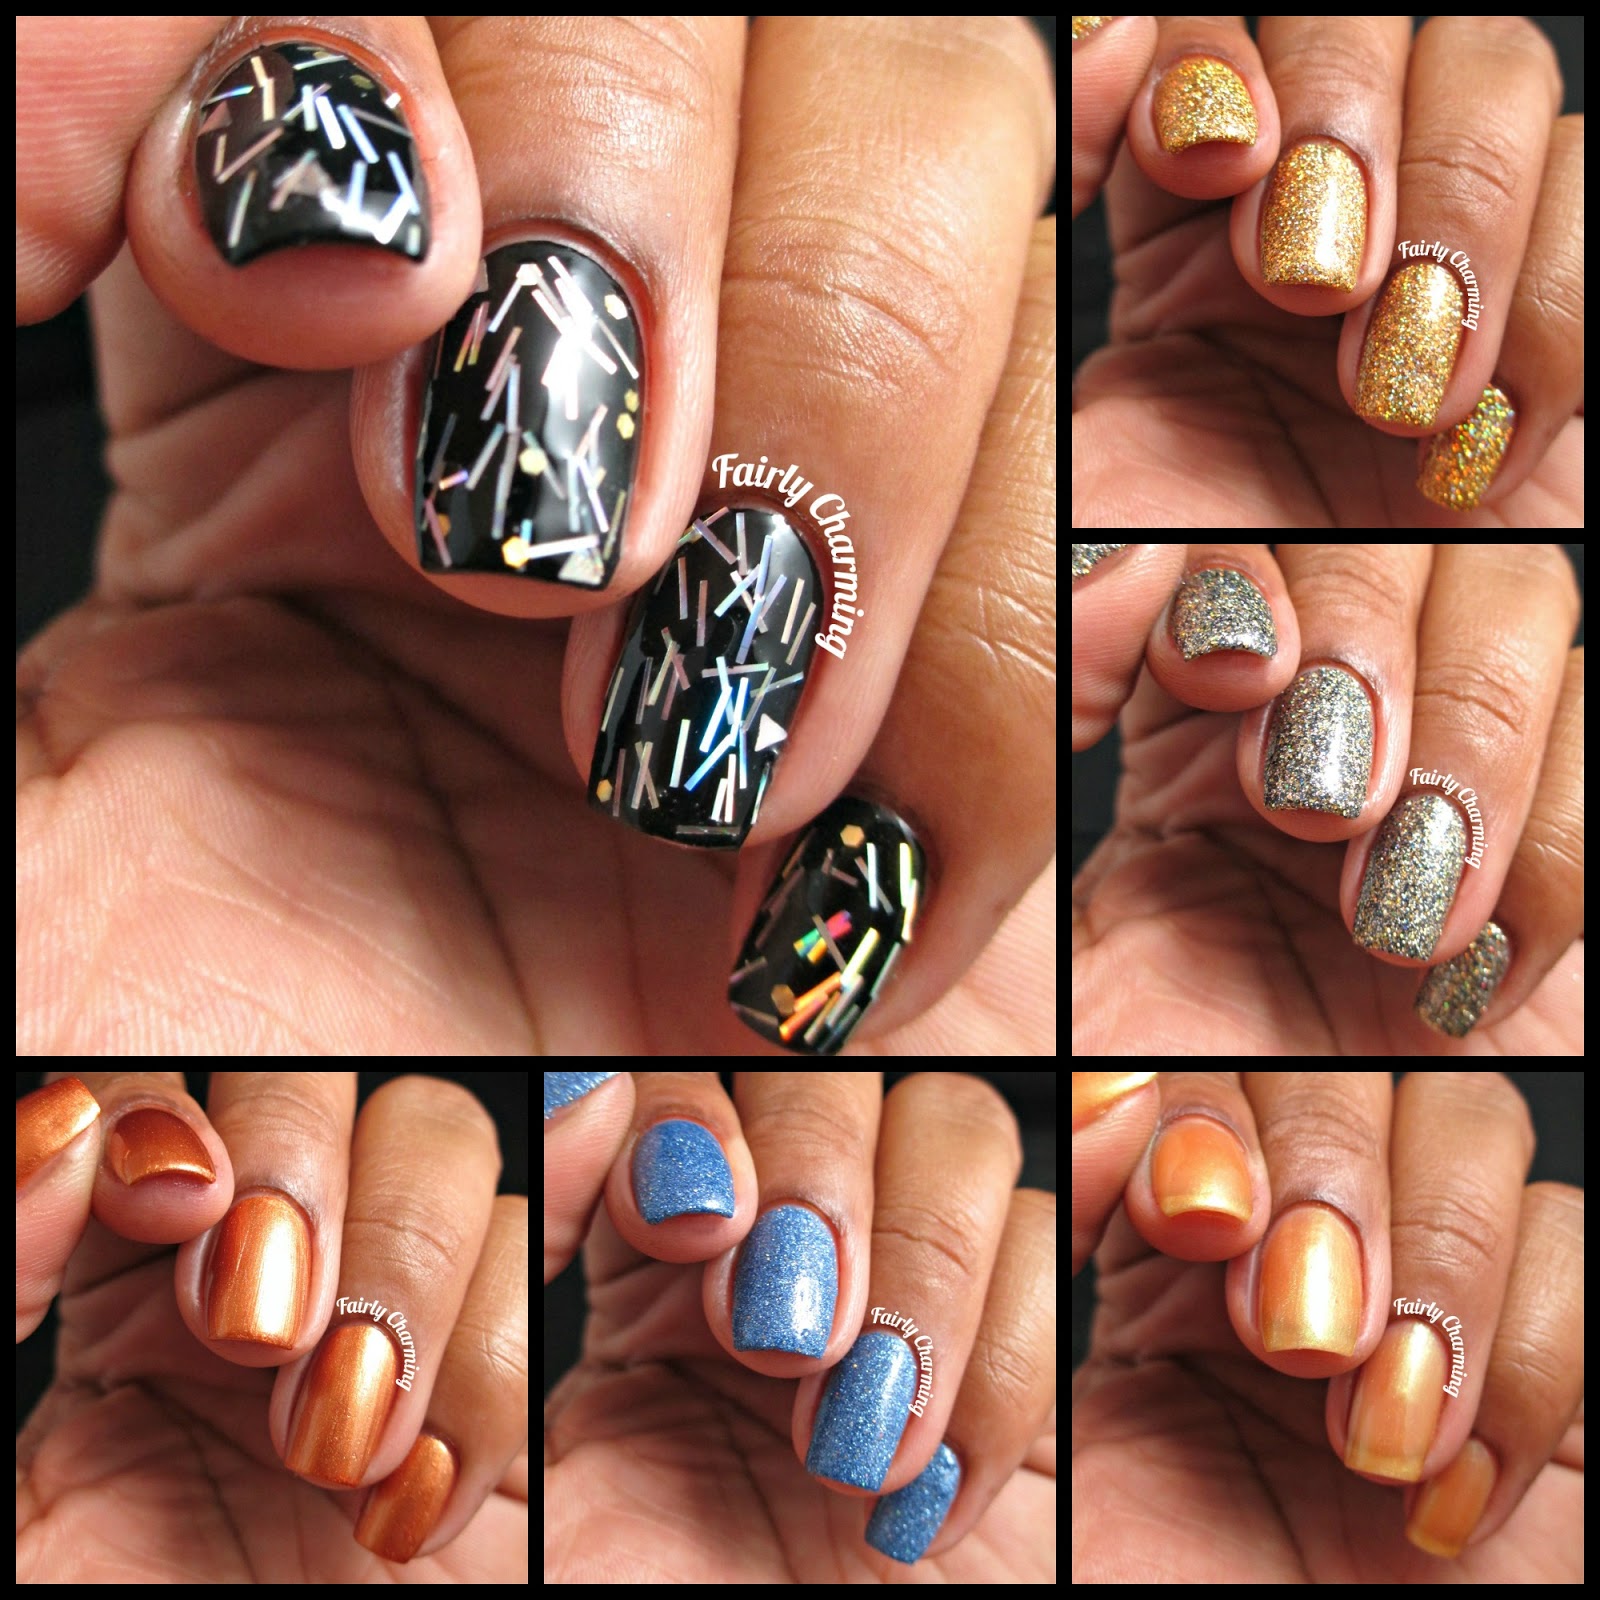
Golden Bronze is a copper-leaning gold that was surprisingly creamy in application.  I applied 2 coats but could have easily gotten away with one.  I don't usually go for polishes like this, but I really enjoyed this one. It looked like shimmery butterscotch on my nails; good enough to eat haha.  Shown is 2 coats with top coat.


 Simply Beautiful - Periwinkley

Periwinkley is a polish jam-packed with blue micro and silver holo glitters.  The formula on this one is on the thicker side, so I used the dab and drag method when applying.  The pay-off was well worth it because it is a beautiful color!  Shown is 2 coats with top coat.

 Simply Beautiful - Old Gold

Old Gold is a sheer gold jelly with opalescent shimmer that shifts from yellow to green.  While I don't think it was flattering for my skin tone, it is a very neat looking polish.  I think it could be an awesome jelly-sandwich with a green glitter :)  Shown is 2 coats with top coat.

 Simply Beautiful - Sacred Diamonds

Sacred Diamonds is a mix of gray, black and holo silver glitters,  As with all glitter/glitterbomb polishes, the dab and drag method is highly recommended with this polish (especially as this polish is on the thicker side).  The sparkles in this polish certainly make it worth the effort :)  Shown is 2 coats with top coat.

 Simply Beautiful - Brilliance

Brilliance is a gold holo glitter polish. Of the 6 that I swatched, this ones's my favorite!  It's an Amazing compacted glitter polish; almost a 1 coater (swoon!).  The formula is excellent as well, very easy to use.  Shown is 2 coats with top coat.

 Simply Beautiful - Popping Bottles

Popping bottles is a fun glitter topper of silver holo stripe, triangle and hex glitters.  I expected to have some "fishing" issues because of the glitter shapes, but I was surprised to find this topper easy to work with.  Again, I used the dab and drag method to get an even spread of glitters on each nail.  This totally gives of a club vibe haha.  Shown is 1 coat over black with top-coat.


Simply Beautiful polishes can be purchased HERE and retail at $7.00.  Are there any colors that popped out at you?  Let me know in the comments below :)

Until next time!

Stef <3


* This product was purchased by me for review at a 72% discount.  I received no payment or other compensation for the review of this product.  The opinions stated here are completely my own.  The contents of this review are based on my direct experience with this product.

Wednesday, April 16, 2014

Simply Charming

Hello dolls!

Today I have another simple mani to share with you.  It features another new-to-me indie, Bliss Polish (*disclaimer)...


 Colors Used: Bliss Polish - Charming, China Glaze - Metro Pollen-Tin

Charming is from the Bliss Polish Son's Of Anarchy Collection (one of my guilty pleasure shows!) and it's a white crelly with some gold flakes and shimmer mixed in.  Very subtle and oh so pretty!  I applies 2 coats over a white base to start...


 I then used a chevron guide that I bought over at Nail Vinyls to apply my yellow tips.  Side note... This is my new fave yellow, application was a dream!  I then took a large dotting tool and dotted away :)  Everything was top coated with my "mystery" top coat...

Kinda reminds me of sunny side up eggs :P


Happy hump day!

Until next time!

Stef <3


* This product was purchased by me for review.  I received no payment or other compensation for the review of this product.  The opinions stated here are completely my own.  The contents of this review are based on my direct experience with this product. 

Thursday, April 3, 2014

Stairway to Princess Jess!

Hello lovelies!

I have a new-to-me indie to share with you today... Drip Drop Nail Paint!  I discovered this brand via Instagram and had to give it a try...


 Colors Used: Drip Drop Nail Paint - Princess Jess and Stairway to Heaven, Orly - Pointe Blanche, OPI - Love. Angel. Music. Baby.

I had seen swatches of Stairway to Heaven (a white crelly with pink and gold glitter) on IG and fell in love with it (I'm a sucker for white crellys!), so I went to Jessica's shop to purchase it.  While there I scrolled by Princess Jess (a pink creme with gold glitter) and immediately knew I had to pair them in a mani.... soooooo I bought them both lol.

The formula is great with both polishes!  2 coats of Stairway to Heaven over white on my middle finger and 2 coats of Princess Jess on my index and pinky.


 I decided a zig-zaggy accent would be most fitting for an accent nail.  I used guides from Nail Vinyls and brushed OPI's gold satin polish (from the Gwen Stefani Collection) over white.  Everything was top coated with a fast-drying topcoat I purchased at a nail supply store in a huge bottle (I have no idea what brand it is because there is just a label from the store on the front lol, but it's seriously the best topcoat I've ever used!)

Heaven... I'm in heaven!


I meant to post these earlier in the week, but I had to bring extra work home and so blogging was put on the back burner.  My photo vault is getting crowded; I really need to go on a blogging binge or something haha :)

Until next time!

Stef <3


* This product was purchased by me for review.  I received no payment or other compensation for the review of this product.  The opinions stated here are completely my own.  The contents of this review are based on my direct experience with this product

Friday, March 28, 2014

It's My Golden Birthday!

Hello lovelies!!

Well, today is my golden birthday!!  What is a golden birthday you ask?  It is when your age and birth date are one and the same.  I am now 28... it's March 28th... you get the picture lol.  So I've decided to celebrate in style with my favorite ladies, The Golden Girls :D


 Colors Used: B Squared Lacquer - White Lights, Shimmer Polish - Tracy

This is actually a pretty simple mani.  I used a B Squared Lacquer's White Lights (a white crelly with gold glitter) and Shimmer Polish's Tracy as an accent nail.  As with the other Shimmer's I've reviewed in the past, I was blown away by Tracy!  I used 2 coats over a gold base and it is completely opaque!!  I think Cindy has truly defined the "glitter bomb"... holy cannoli!!  The studs came in a kit from Nail Art Society :)


 The Golden Girl decals are from Nail Spin.  Aren't they so cute??!!  I actually purchased a sheet of 15 decals of varying portraits of the ladies, but I couldn't chose between them so I used the group photo.  It's ever so blurry but I don't really care... I know who they are and that's what counts lol ;)

Happy, happy, joy, joy!!!


I hope you all have a fabulous Friday and a wonderful weekend!

Until next time!

Stef <3


*Shimmer Polish's Tracy was provided to me for review.  Nail Spin's decals were purchased by me for review  I received no payment or other compensation for the review of these product.  The opinions stated here are completely my own.  The contents of this review are based on my direct experience with these product.

Monday, March 10, 2014

A Wild Frenchie

 Hello dearies!

I have a simple frenchie to share with you today!  If you have the basics of a french manicure down, this look is pretty simple.  If the idea of giving yourself a french mani gives you hear palpitations... all I can say is practice, practice practice lol.  I've only just recently felt like my frenchie's are presentable and I've been working at it for a couple of years ;)


 Colors Used: Shimmer Polish - Irene, China Glaze - Turned Up Turquoise, Sinful Colors Nail Art - Time Off

I started with a taupe base on my tips.  After getting the crescent shape that I wanted, I went back over my tips with Irene using a striping brush.  Irene is an absolute stunning glitter polish!  It's a mix of champagne, gold, silver and holo micro glitters.  I wish I could have picked up just how rainbowy this beauty is.  Trust me... it's a stunner!!


Once I had my tips the way I wanted them, I took a dotting tool and splotched out my turquoise spots.  I then used a black striper amd outline my spots.  Lastly, I top coated with Duri Miracote.
 

I like that this is elegant white adding a pop of fun and color!  I really love the way it turned out :)  For those who are curious, the formula on Irene does not disappoint.  As with all Shimmer's, this polish is compacted with glitter.  I only used one coat of glitter over taupe to achieve opaqueness on my tips!  Irene, along with so many other gorgeous glittering polishes, can be found in Shimmer Polish's Etsy Shop :)

Until next time!

Stef <3


* This product was provided to me for review.  I received no payment or other compensation for the review of this product.  The opinions stated here are completely my own.  The contents of this review are based on my direct experience with this product.

Saturday, January 18, 2014

Add a Little Lace!

Hello, dolls!

Happy Saturday to you all!!  I hope you had a fantabulous week and are enjoying your weekend :)  Today's post is a simple one.  I've really been into black/dark polish the last couple of weeks.  There is just something so elegant about dark polishes... I dunno lol...


Rimmel Black Satin, China Glaze Champagne Bubbles, Fingrs Lace Up Kit, black, gold, lace, elegant, simple, formal, black tie, nails, nail art, nail design, mani
 Colors Used:  Rimmel - Black Satin, China Glaze - Champagne Bubbles

I started with 2 coats of Black Satin and Champagne Bubbles (from CG's 2011 Holiday Collection).  I feel like it's the perfect shade of yellow gold for me.  Sometimes gold polishes can make my nail look gangrenous.  It's not cute haha.


I then applied a lace applique from a Fing'rs "Lace Up" kit I found at Walmart a while back.  I seriously love these stickers.  They make nail-arting a cinch when you're in a hurry!

I added the crystal at the last moment and then top coated with OPI Rapi Dri :)

 Gotta love lace!


Alright lovelies, I'm off to do a million and one things!  Have a good one :D

Until next time! 

Stef <3

Tuesday, December 31, 2013

Bye Bye 2013!

Good afternoon, lovies!!

The time is quickly coming upon us to bid farewell to 2013.  It's been a really great year and I'm a little sad to see it go.  Lots of memories has been made, I've connected and made friends with so many people in the nail community... lots of polishes were purchases lol.  I did a quick mani for the occassion (altho it probably won't be what I end up wearing when the clock strikes 12... I'm itchin' to do another!)...

B Squared Lacquer White Lights, New year's Eve, NYE, 2014, champagne, champagne flute, bubblt, white crelly, gold, glitter, nails, nail art, nail design, mani
 Colors Used: B Squared - White Lights

I purchased this polish sometime before Christmas and It came in the mail the day after or so.  It is from a Christmas collection, but I thought it could be very fitting for NYE as well :)  I started with 2 coats of White Lights over a white base.  This polish is a white sheer crelly with a mix of different sized gold glitters.  Application was easy and the glitters spread out nicely.


I then used combos of a nail art pen, nail striped and dotting tools to draw my design.  Number and letter are the hardest for me, very frustrating!  After a second attempt at getting my numbers *perfect* I top coated everything with OPI Rapi Dri.


I'm ready for some bubbly!

I just want to thank you all for your continued reading and support.  I read every single comment that I receive but rarely have time to respond :(  Thank you for the well wishes while I was sick, it warmed my feverish heart haha.  Love to you all and have a safe and happy evening!!

Until next time!

Stef <3

Tuesday, November 19, 2013

Naughty Nails?

Good morning, dolls!

It's been a crazy couple of days for me (and from the sounds of it, it's only going to get crazier)!  It's the reason i have been unable to post... or do my nails... *sigh*.  So , I'm pulling one out of the vault for you today :)

Sinful Colors Whipped, OPI Goldeneye, cheeta print, leopard print, matte, matte black, animal print, stud, gold, gold stud, black and gold, nails, nail art, nail design, mani
 Colors Used: Sinful Colors - Whipped and Nirvana, OPI - Goldeneye

This is a really basic mani that I ended up loving a lot.  I'm not a huge fan of animal prints in general, but I've made the exception for nail arting because it's pretty cool lol.  This mix of print and "leather" does feel a bit wild/risque to me ;)


I started with Whipped, which is from the SC Leather Luxe collection.  It is my favorite black matte polish... ever.  Loves it so much!  Anywhosy, there's 2 coats of Whipped applied.  For my ring finger, I did 3 coats of Goldeneye over a gold base.  i then used my dotting tool and striping brush to create my print.  The gold stud was an after-thought and it was applied with a dab of nail glue :)


Rawr!


I hope all is well and I'm sending out virtual hugs :D

Until next time!

Stef <3

Wednesday, September 25, 2013

Trending Now - Blue & Gold

Hey dolls!

Today's mani is a simple one.  I was debating on whether or not I should even share it.  But then I ran into 3 other girl's rocking similar mani's on Monday and I thought it was just too bizarre of a coincidence to pass up on lol...

Kleancolor Blueberry Drama, Love & Beauty Gold Glitter, blue, gold, nails, nail art, nail design, mani
 Colors Used: Kleancolor - Blueberry Drama, Julep - Felicity, Love & Beauty - Gold/Multi

Did I miss some sort of memo that stated blue and gold are in for the season??  Because it totally is!  I've been putting together blue and goldenrod outfits unintentionally for the past couple of weeks.  It's like my subconscious is tuned in to the trending gods or something (haha I kid).   I had 3 girls stop me at work on Monday and show me their blue/gold nails and I was blown away!


This is 2 coats of Blueberry Drama, with 3 coats of the gold glitter over Felicity on my ring finger.  I used my striping brush to freehand the stripes on my middle finger and then I top coated with Color Club Clear.  if you look closely you'll see how the blue bled thru the gold stripes.  I was not pleased...


I think blue polishes and I are going to be great friends this winter ;)

Until next time!

Stef <3

Monday, May 20, 2013

A Neutral Skittle

Hello, dolls!

I have another subdued-ish manicure to share with you today.  "Two nude mani's in a row??!!", you say... I promise I'm not a pod person ;)  I've been doing so many bright/crazy mani's recently that I decided I needed a "palette cleanser"...


OPI Goldeneye, Julep Ginger, Love & Beauty Beige Nude Ginger, nude, skittle, nails, nail art, nail design, mani
 Colors Used (L to R): Julep - Ginger, Love & Beauty - Beige, OPI - Goldeneye, Love & Beauty - Ginger, Love & Beauty Nude

Man oh man, I cannot wait to get my light tent!  I'm sooo incredible frustrated with how the lighting in these pics turned out... grrrr...


 Anywhosie, these are all 2 coaters except for Goldeneye.  3 cotas for that  one.  I had seen a mani on Pinterest that used different nudes and a glitter to create a skittle and I loved the idea.  I've tried to figure out who originally did the mani, but the pin leads nowhere and I can't really red the watermark :(  It's a great mani tho hahaha...


I will have my first installment of the May TPC up tomorrow.... that's all of the new news I've got for ya :P

Until next time!

Stef <3