Friday, October 31, 2014

Halloween Stained Glass

Happy Halloween dolls!!

It's here, we've made it!  This is the last Halloween nail art I'll be doing this year (woohoo!!) and since it is also the last day of the month, that means this is a Proud Beauty Bloggers of Color Collaboration!  The theme this month naturally is Halloween colors...

 Colors Used: Acrylic Paints

I opted to try a look that I've never done before, stained glass.  I'm pretty pleased with how it turned out :)  I didn't really use rhyme or reason with this pattern... I just sort of winged it haha.


I only used acrylic paints for this along with a striping and detail brush.  The only polish used was top coat!  Looking at them now I wish I had topped them with CG Fairy Dust but alas, I did not :P

Definitely a look I want to try again!


I hope you all have a very safe a fun evening!  Try not to get too sick off of all those sweets ;)

Until next time!

Stef <3


Thursday, October 30, 2014

PANC Takes On Halloween!

*Disclosure
Hello lovelies!

I have a quick swatch post for you today featuring 2 Halloween themed beauties from Polish Addict Nail Color...


PANC - Trick Or Treat

Trick Or Treat is a pale orange crelly with a mix of glitters in various sizes and shapes.  This was a Limited Edition (LE) polish for October that unfortunately has sold out.  I really fell in love with this color when I first saw it and immediately had to have it!  Shown is 2 coats with topcoat.

 PANC - Murder House

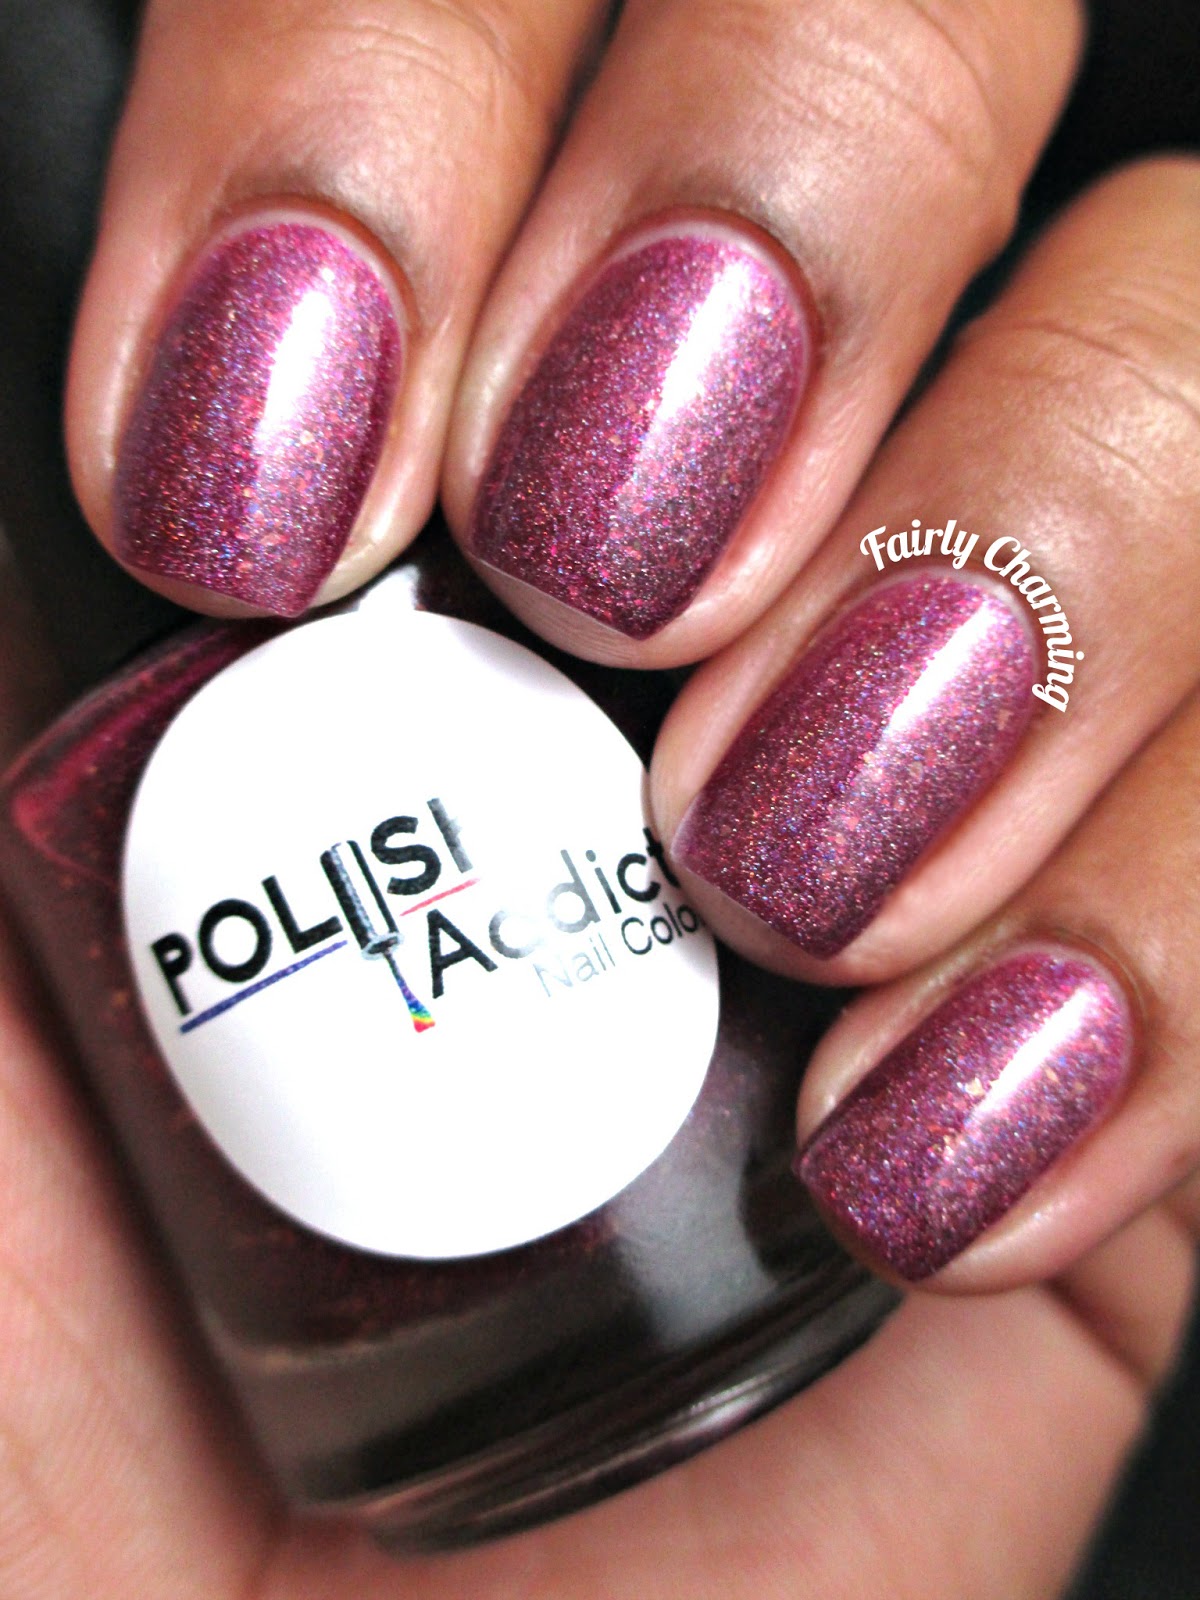
Murder House is a burgundy holo with tango-red, gold and neon pink flakies in it.  The holo finish in the polish is very subtle, but lovely.  I wore this polish for a couple of days actually.  This polish is currently available in the PANC store and it's on sale!  Shown is 2 coats with topcoat.


The formula on PANC's are overall really great, I've never had an issue.  For these and more color selections you can visit the PANC store front here.  You can also follow them on Facebook for updates :)


Until next time!

Stef <3


* This product was purchased by me for review at a 20% discount.  I received no payment or other compensation for the review of this product.  The opinions stated here are completely my own.  The contents of this review are based on my direct experience with this product.

Wednesday, October 29, 2014

Punkin's!

Hello dolls!

I have a quick and easy mani to share with you today... falling pumpkins!  I don't know what my obsession is with painting small things on my nails right now lol.  First acorns, then eyeballs, then skulls and now some pumpkins inspired by @clairelofthouse...


 Colors Used:  L'Oreal - The Queen's Ambition, Orly - Mayhem Mentality, Revlon - Lime Basil

I used all polishes for a change in this mani :)  I started with my black/silver glitter base, with 2 coats for coverage.


 I then took a medium sized dotting tool and started to place my pumpkins.  With a detail brush, I applied the stems and then I top coated.  Simple, right?

Me likey :)


I'm sorry I've been MIA for the last couple of days.  After that epic KBShimmer post, my brain needed a bit of a break.  I've got one more simple Halloween mani to share with you on Friday a long with some more swatch posts...

Until next time!

Stef <3

Sunday, October 26, 2014

SAFS: KBShimmer Winter 2014 Collection

*Disclosure

Hello dolls!

For today's edition of "Sunday's Are For Swatching", I have a selection of colors from KBShimmer's Winter 2014 Collection...


I am over the moon with these polishes!  They're all so fantastic, so let's get started ;)

KBShimmer - Flake Dance

Flake Dance is a holo glitter topper with a smattering of hexes, circles, micro and snowflake glitters.  I used the "dab & drag" method when applying this polish, with some glitter placement for the snowflakes.  Shown is 1 coat over a blue base with base and top coats used to smooth the glitters.

 KBShimmer - Let's Sleigh Together

Let's Sleigh Together is a pale grey crelly with a mix of green navy and mint hexes, blue circles and holo micro glitters.  I really loves this one.  Application was an easy, creamy breeze!  Shown is 2 coats with top coat.

KBShimmer -  Merry Pinkmas

Merry Pinkmas is a returning Christmas favorite for KBShimmer!  It's a cotton candy crelly that featured a variety of red, green and neon glitters in lots of shapes and sizes.  Shown is 2 coats with top coat.

 KBShimmer - Fallen Angle

No... that's not a typo!  Haha Fallen Angle is a royal blue jelly with holo blue triangles, siver and blue hexes and mirco glitters mixed in.  Get it?  Angle??  Because of the triangles???  Just making sure ;) I took some extra care applying this one.  I wanted to be sure I got a good spread of glitters.  Application wasn't difficult. Shown is 2 coats with topcoat.

KBShimmer - White Here, White Now

White Here, White Now is a snowy textured polish.  It's so fun!  Application was really easy with great coverage, even in the first coat.  Shown is 2 coats, no top coat.

 KBShimmer - Sugar Plum Faerie

Another returning favorite this season, Sugar Plum Faerie is a plum crelly with berry, purple and lime holo glitters mixed in.  When applying, the first coat was more sheer than I expected. But it was very easy to work with and by the second coat, I was golden.  Shown is 2 coats with top coat.

 KBShimmer - Pine-ing For Yule

Pine-ing For Yule is the 2014 Toys For Tots charity polish.  It's adorbs!  This glitter topper is Christmas tree inspired with a mix of green triangles, red stars, silver hexes and micro glitters.  I had absolutely no issue with the glitters coming out of the bottle; this is a very compacted polish.  I used the "dab & drag" method again in my application.  Shown is 1 coat over a white base with base and top coats used to smooth the glitters.  For each bottle sold at kbshimmer.com from 11/1 - 12/15, $4 will be donated to Toys For Tots.

 KBShimmer - Too Cold To Hold

Too Cold To Hold is a sapphire blue base filled with holo silver, blue, and green glitters for a bejeweled textured look.  It is by far my favorite; just sooooo pretty!!  Application was smooth and easy.  Shown is 2 coats with top coat.


The full Winter 2014 collection will be released on 11/1.  You can see a sneak peek of the entire collection here ;)

I'll be back later this week with some more Halloween nail art...

Until next time!

Stef <3


* This product was provided to me for review.  I received no payment or other compensation for the review of this product.  The opinions stated here are completely my own.  The contents of this review are based on my direct experience with this product.

Thursday, October 23, 2014

KBShimmer Fall 2014

*Disclosure

Hello lovelies!

I know it's not Sunday, but I just couldn't wait to show you these KBShimmer's :)  These polishes are from the new Fall 2014 collection and they are amazing!!

 KBShimmer - Fall 2014

 I have a serious love for KBShimmer; their formula is always amazing and the colors are on point.  I feel that the brand is often setting trends and doing it well with a high quality (and affordable) product.
KBShimmer - Rust No One

Rust No One is a gorgeous linear holographic polish.  While my camera picked up a lot of red in this swatch, this is more of a rusty red-orange color in person.  I just have no words for this awesomeness!  The formula is just what you want from a holo; not too goopy, not too runny... just right.  Shown is 2 coats with top coat.

 KBShimmer - Flannel Surfing

Flannel Surfing is a faded blue crelly with a mix of orange, aqua and teal glitters. I've seen quite a few swatches of this polish that have had me swooning.  It's such a flattering shade of blue that's lovely on every skin-type I've seen thus far.  Shown is 2 coats with top coat.

 KBShimmer - How You Dune?

How You Dune is a greige creme polish.  What is greige?  Only one of my favorite colors ever!  It's a grey/beige shade that I just love love love and this creme is especially creamy :)  The formula is perfect; when I opened the bottle I did a little happy dance in my chair haha.  Shown is 1 coat with no top coat (gah!).

 KBShimmer - Spot Sign

Spot Sign is a mix of black leopard spot shaped glitters, black dots, small black hexes and micro holographic sparkle.  This polish is actually apart of the Winter 2014 collection, but was released a little early due to all of the excitement behind this new glitter.  It's pretty much the coolest glitter topper that's come out in a long time.  I lurvs it :)  You would think the application on this would be a bear, but it really wasn't at all.  An average of 2-3 leopard spots came out on the brush with each dip.  I dabbed and brush; very little "glitter placement" was needed for me.  Shown is 2 dabbed coat over How You Dune? with top coat.


KBShimmer polishes retail at $7.50 for creme polishes and $8.75 for crelly/glitter/holo/etc. polishes.  You can purchase KBShimmer polishes HERE.

So what do we think?  I hope to have some selections from KBShimmer's Winter 2014 collection up this Sunday, so stay tuned...

Until next time!

Stef <3


* This product was provided to me for review.  I received no payment or other compensation for the review of this product.  The opinions stated here are completely my own.  The contents of this review are based on my direct experience with this product.

Wednesday, October 22, 2014

Skele-tons Of Skele-fun!

Hello lovlies!

I changed my mind since yesterday.  I am NOT over the Halloween manis lol.  I was just lacking inspiration, but then out of the blue yesterday I decided I wanted to try skulls.  Executing this thought in my head was more difficult than I thought, but once I figured it out it was a cinch.
 
 Colors Used: Mentality - Tempest, Sally Hansen - White On, Acrylic Paint

I started with my matte base color, Tempest.  This beauty only needs one coat; it's my favorite of my Mentality collection ;)  I then took the end of a nail art brush (because I don't have a dotting tool this large) and placed large white dots on my nails.


I then took a detail brush and applied white stripes (with acrylic paint because it's easier to work with) for the jaws.  I straightened out the jaws with a swipe of Tempest across their bottoms and topped with Mentality Matte Top Coat.

 "You wanna know why skeletons are so calm?  Because nothing gets under their skin!" Ba-dum-bum!


I really really love the way these turned out!  But... I am now uninspired again hahaha.  Any suggestions???

Until next time!

Stef <3


Tuesday, October 21, 2014

Candy Corn Tips!

Hello dolls!

I have a quick and simple Halloween mani to share with you today.  Not gonna lie... I think I might be over the Halloween nails lol.


 Color Used: Candy Lacquer - Candy Corn-flower

I thought this glitter topper might make a good candy corn gradient and I'm so glad I tried it!  This polish is a huge mix of glitters. Hexes, squares, flowers, dots... all different sizes and in candy corn colors.  It's so cool!  I was gifted this polish by the sweet KellieGonzo and I love it :)


 To achieve this look, I used a latex-free makeup sponge and dabbed on the glitter.  I was careful to not pile on the glitter when applying and went through about 3 times with this coats.  I topped it with a base coat to smoth out the glitter and then applied my regular top coat.

Super simple!


This polish was released in 2012 and I can't seem to find it available by anyone online (such is the way with indies).  BUT!  I do know that other indies have candy corn toppers available now.  You could also approach an indie and ask for them to make a custom polish for you like this one (if you're as crazy about polish as I am lol).  

Until next time!

Stef <3

Sunday, October 19, 2014

SAFS: Dragon Claw Polish!

*Disclosure

Hello lovelies!

Welcome to another edition of "Sunday's Are For Swatching"!  Today's swatches are brought to you by a new indie brand on the scene, Dragon Claw Polish...


Dragon Claw Polish is launching their brand with 3 collections starting November 7th.  I received one of the collections to swatch and share with you, my lovely readers :)  This grouping of four beauties is called "The Girls of Famous Asian", inspired by four of the girls that maker Janet works with at a restaurant she runs...

 Dragon Claw Polish - Nessa

Nessa is described as a gorgeous, vampy, quiet person with a touch of flair!


 This is a lavender chrome jelly with a nice mix of scattered holos that really sets the polish off.  It is sheer when first applying, but with 2 coats opacity was easily achieved.

 Dragon Claw Polish - Bren

Bren is describe as a hard working person.  Like a great pair of denim jeans; she is reliable and can hold up to anything!


This is a sparkly, denim blue polish that was a dream to apply!  It is packed with blue micro glitter that were a breeze to clean up in my "messy spots".  Two coats shown.
 Dragon Claw Polish - GEO

GEO is described as a smart, edgy, hard worker with a touch of glamorous attitude!


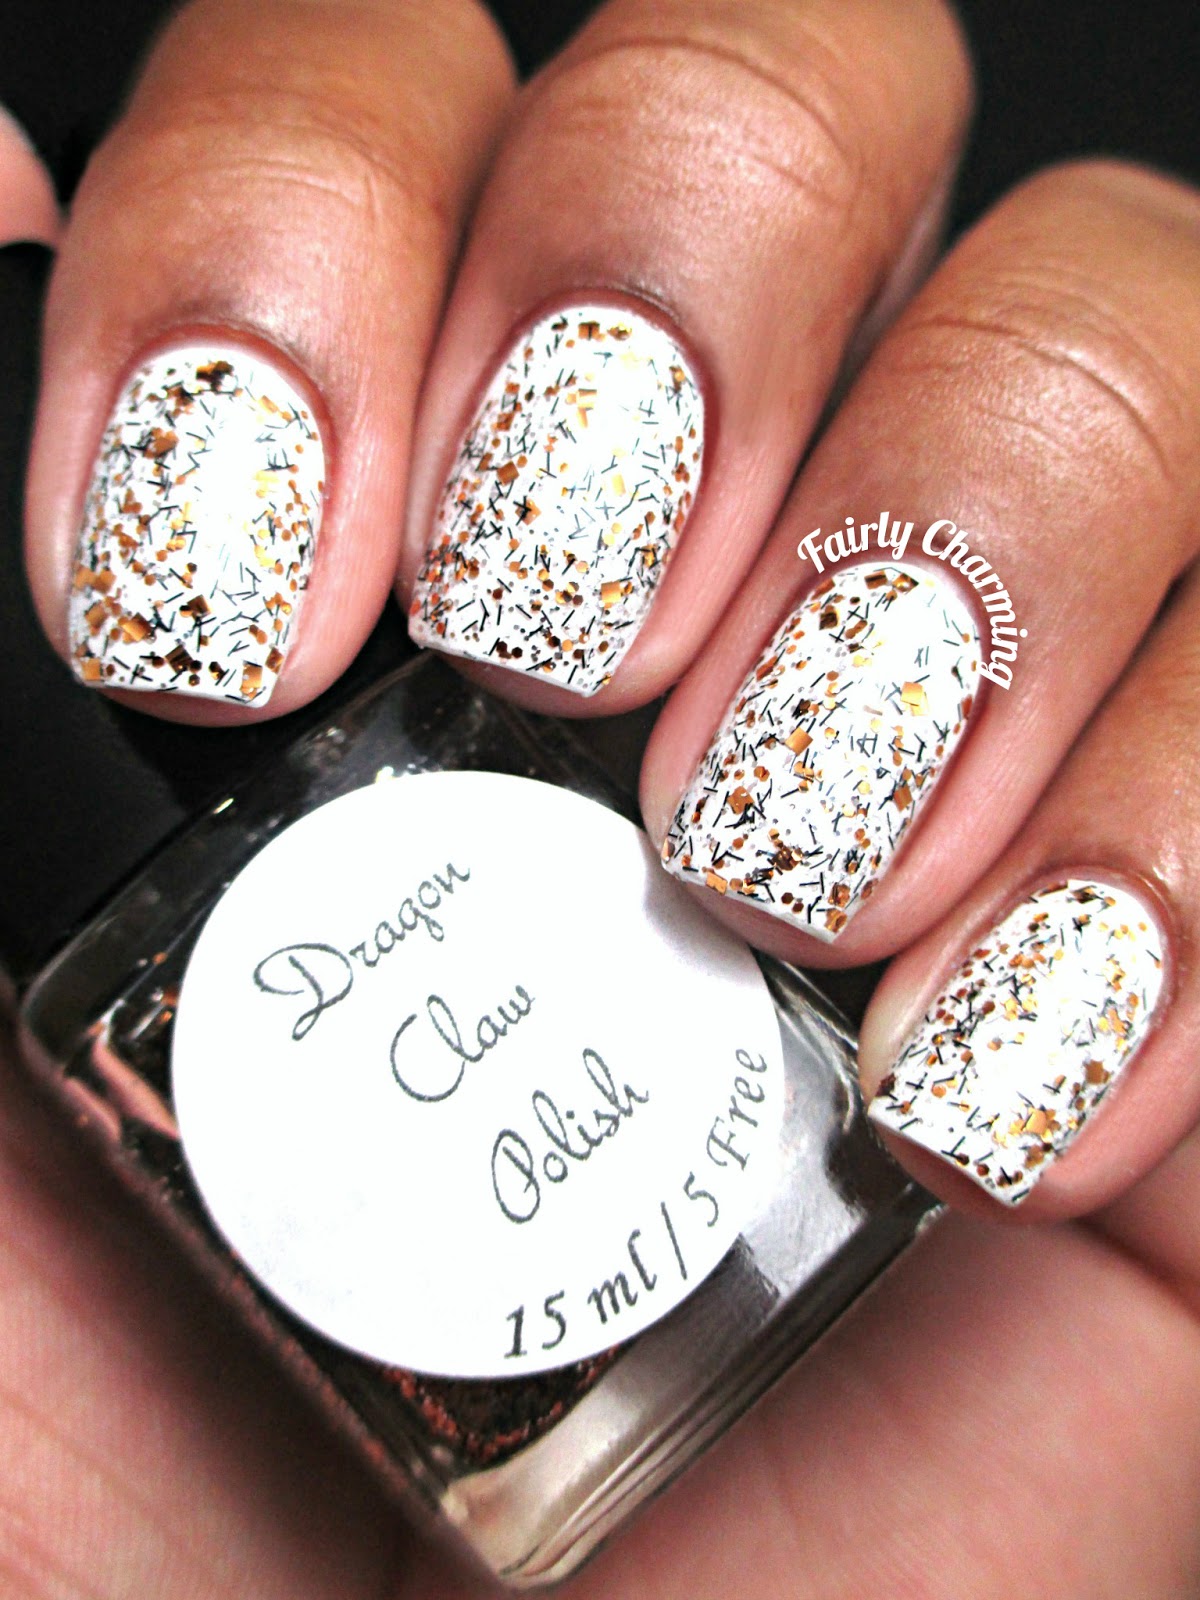
This polish is a mix of black stripe, gold square, gold hex and micro silver glitters in a clear base.  I applied 2 coats over a white base.  The glitter smoothed out very nicely when top coated (I will talk more about the top coat at the end of this review...)

 Dragon Claw Polish - Bea

Bea is described as a happy and friendly person who gives off a positive and calming vibe :)


This polish is definitely my favorite of the four!  It is a gorgeous cerulean blue with bright hex and micro holo glitter mixed in.  This is anothe sheer jelly that built up beautifully in 3 thin coats.  I had difficulty getting the bright hexes out with the brush.  I had to do some fishing and glitter placement, but it was worth the effort because this polish is just so pretty!

Dragon Claw Polish - Diamond Claw Top Coat

Now I have to tell you about this top coat... Oh my word is it amazing!!  I applied it over each polish that I swatched and it's probably one of the fastest drying top coats I've ever used (which is saying a lot since it took me about 2 years to find my staple top coat!).  The very first time I applied it, I was in shock.  By the time I got to painting my pinky nail, my thumb was already dry to the touch!  Even more than that, the top coat passed my "3 minute rub test" where I rub my thumb 3 mins after application.  There was no smudging.  None!  To top it all off, 10 mins after that I did the "smush/fingerprint test",  and while some firm pressing did leave an imprint on my nail, before my eyes the imprint refilled itself like it was receiving a botox injection and went back to it's smooth and glossy state.  Amazing!!


Over all I was pleasantly surprised by this new brand.  I am so excited to see what happens in it's future! 

As stated previously, these polish will be available for purchase HERE on November 7th along with the other 2 collections.  You can follow Dragon Claw Polish on Facebook for updates and product news :)

Until next time!

Stef <3


* This product was provided to me for review.  I received no payment or other compensation for the review of this product.  The opinions stated here are completely my own.  The contents of this review are based on my direct experience with this product.