Showing posts with label Frenchie. Show all posts

Sunday, September 28, 2014

Dotted Frenchie

Hello dolls!

Happy Sunday to you all :)  Sorry I've been MIA the last few days, I've been putting in some serious quality time with the hubs, my family (immediate and in-law's) and close friends (who might as well just be family lol).  Very fun and very exhausting!  So I'm cheating this evening and pulling some nail art I did a couple of weeks ago but never got around to posting :P

 Colors Used: Daisy Nail Lacquer - White Diamond

First off let me that you all for you're lovely comments and feedback in my last post!  It's sometimes difficult for me to get back to blogger to comment on replies, but I read all of the emails and it really does make my day.  Thank you thank you thank you!!  Also I'm very grateful for your tips and suggestions regarding my watermark.  It is a work in progress as I am still getting used to this new-to-me-photo editor, but I did change the color to white (it totally looks much better than the black haha).


This mani was pretty quick and simple.  I was in the mood for a french tip, so I painted all of my tips white and then shaped them with a french brush and acetone.  I buy my french brushes from Jolie Polish because I'm a big supporter of indie brands, but you can also find french brushes at Sally's and other beauty supply stores.  

I took a medium sized dotting tool and with the same white polish to created my polka dots.  I top coated and that was it!


I've got some exciting stuff coming up this week to share with you... and by share I mean give... away.  Ooops that's still supposed to be a secret!  ;)

Until next time!

Stef <3

Tuesday, September 9, 2014

OCC Black Dahlia Frenchie

Hello dolls!

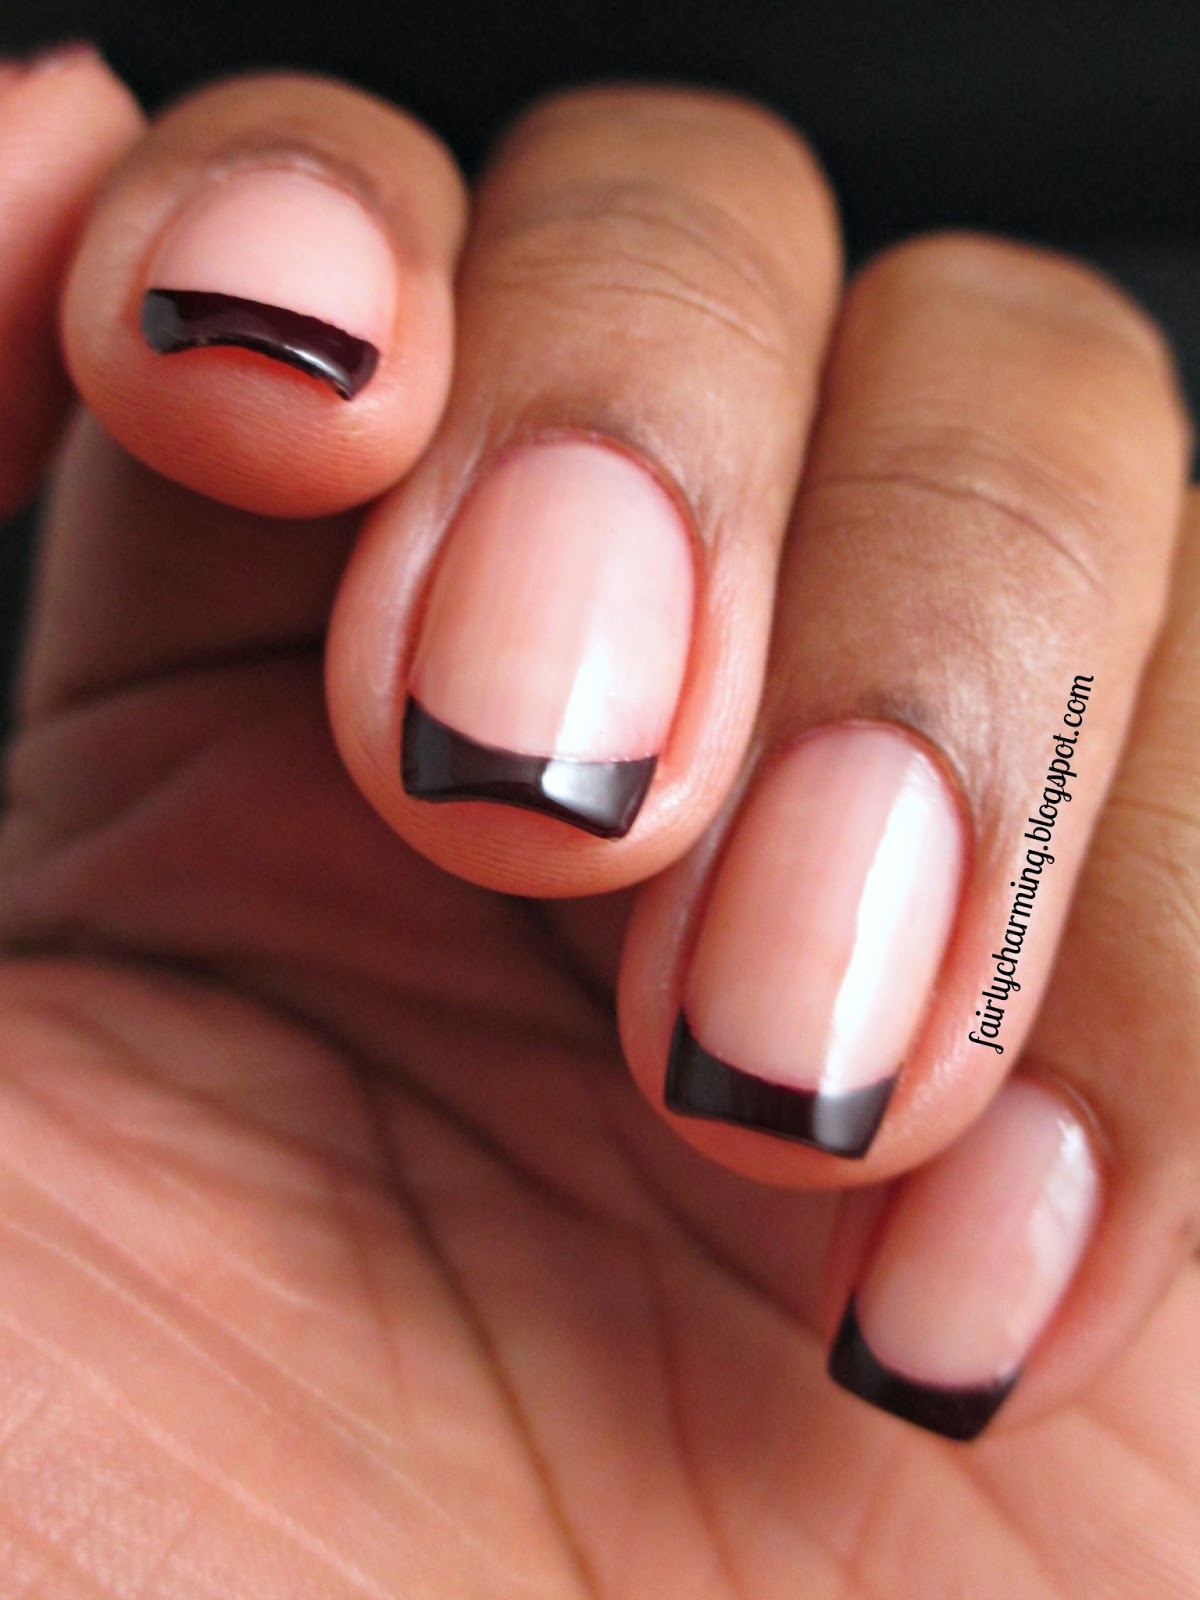
I've been drawing a blank the last few days with nail art.  Feeling a little uninspired and a-lotta-lazy lol.  So I opted to do a simple french manicure (frenchies always make me happy haha).  I figured I'd get into the Fall mood with a rich shade...

 Colors Used: OCC - Black Dahlia

This chocolate-cherry polish came in a set with a Lip Tar of the same shade.  I got it on sale at Sephora (online sale only).  I didn't even know OCC made anything but Lip Tar's, so naturally I had to snag a polish.  It does not disappoint!  It's opaque in 2 thin coats (swatch to come later) and was perfect for this frenchie.


 If you follow me on social media (links are in the side-bar), you might have seen a picture that I posted of the french brush I use for clean-up.  I used this same brush to get a clean smile line on my french tips.  The rounded bristles are perfect for the job :)  You can find more details about this brush in my IG post.

Sometimes a girl just needs a simple frenchie!


Happy Tuesday loves :)

Until next time!

Stef <3

Wednesday, July 30, 2014

Painting the Roses Red

Hello dolls!

I have a quick post for you this evening (I have to go start dinner for the hubs haha).  I bought a set of cheap acrylic paints at Wal-Mart last week in the hopes of advancing my nail art skills because I feel like it's time for me to challenge myself a little bit more.  I need to step out of my cutesy comfort zone ;)  So, I decided to try a floral design over french tips...

 Colors Used: Daisy Nail Lacquer - White Diamond, Orly - Beverly Hills Plum, Acrylic Paint

I started with a basic french tip (white tips, pink base).  I then took a thin nail art striper and painted black branches.  After the paint set I continued with that same thin striper and painted the green leaves; first with the darker green, then the light.


For the roses, I took out a detail brush and painted dark red blobs.  I tried my hand and definition with red orange and pink.  I top coated and was done.

Ta-da!


I think what I love most about acrylic paint is that it dries incredibly fast!  I can wait to continue my education in actual art hahaha :P  Oh and thank you all for the lovely comments on my bubble mani!  I haven't had a chance to reply but it seriously made my week.  Love to you all!!

Until next time!

Stef <3

Wednesday, April 30, 2014

China Glaze Shocking Pink

Hello dearies!

Just a quick post this evening featuring a new-to-me China Glaze...

 Colors Used: China Glaze - Shocking Pink, Formula X for Sephora - Blast Off, Sinful Colors - Time Off

I started with my base of Shocking Pink.  I loved how bright it was in the bottle and had just had to buy it.  The formula... it's shockingly bad!  After 3 runny coats it was still quite streaky and I was very annoyed.  I gave up after the 4th coat and threw some black glitter on stop to cover up the bald spots...


Once it all dried, I used striping tape and transparent tape as guides for my tips.  all was topped with my "mystery top coat".  Overall I really love the way this turned out...

But that formula tho!


If you haven't done so already, be sure to check of my 2 year blogiversary giveaway!  It ends at 12:00am PST on Friday :D

Until next time!

Stef <3

Monday, March 10, 2014

A Wild Frenchie

 Hello dearies!

I have a simple frenchie to share with you today!  If you have the basics of a french manicure down, this look is pretty simple.  If the idea of giving yourself a french mani gives you hear palpitations... all I can say is practice, practice practice lol.  I've only just recently felt like my frenchie's are presentable and I've been working at it for a couple of years ;)


 Colors Used: Shimmer Polish - Irene, China Glaze - Turned Up Turquoise, Sinful Colors Nail Art - Time Off

I started with a taupe base on my tips.  After getting the crescent shape that I wanted, I went back over my tips with Irene using a striping brush.  Irene is an absolute stunning glitter polish!  It's a mix of champagne, gold, silver and holo micro glitters.  I wish I could have picked up just how rainbowy this beauty is.  Trust me... it's a stunner!!


Once I had my tips the way I wanted them, I took a dotting tool and splotched out my turquoise spots.  I then used a black striper amd outline my spots.  Lastly, I top coated with Duri Miracote.
 

I like that this is elegant white adding a pop of fun and color!  I really love the way it turned out :)  For those who are curious, the formula on Irene does not disappoint.  As with all Shimmer's, this polish is compacted with glitter.  I only used one coat of glitter over taupe to achieve opaqueness on my tips!  Irene, along with so many other gorgeous glittering polishes, can be found in Shimmer Polish's Etsy Shop :)

Until next time!

Stef <3


* This product was provided to me for review.  I received no payment or other compensation for the review of this product.  The opinions stated here are completely my own.  The contents of this review are based on my direct experience with this product.

Tuesday, December 24, 2013

A Christmas Eve Inspiration!

Hello my loves!

I can't believe Christmas Eve is finally here... hallelujah!!  This has been by far the busiest season for singing I have ever had and my nails have definitely suffered for it :(  I mentioned last week that I broke a nail on my picture hand and am now down to nubs *sigh*.  It's so hard to be inspired to do nail art when my fingers look and feel like stubs lol.  So I've been occupying myself with other things... like building a new work/nail station (!!!!), but that is for another post ;)  This post is about the ladies who inspired a mani that makes my hands feel pretty again lol...

Spellbound Nails Pish Salver, Drink Me, black tips, white glitter, silhouette, Christmas, Christmas Tree, snow, simple, easy, nails, nail art, nail design, mani
 Colors Used: Sinful Colors Nail Art - Time Off, Spellbound Nails - Pishsalver (Drink Me)

I was perusing thru my Instagram feed the other day and saw this fabulous mani by @hillarykozuch where she combined black tips with white glitter.  I loved it!  She mentioned in a comment that she was inspired by Cajon De Los Esmaltes and I thought, "Oh, how nice!".  I then went about my merry way...


Last night while racking my brain trying to think of a quick and simple Christmas-y mani I got frustrated and went to Google.  Lo and behold Ms. Cajon's mani popped up!  It was fated that I try this look and I'm so very glad I did.  My nubbies look presentable lol.

Thanks for the inspiration ladies!


I hope you all have a very lovely day!  I'll be back later with some... "shimmer" ;)

Until next time!

Stef <3

Tuesday, December 3, 2013

Snowflakies!

Hello, lovelies!

I have my first Winter/Christmas mani to share with you today.  I wanted to start off my holiday nail arting with something simple.  Well... simple looking lol.  Snowflakes have been a work in progress for me (last year's snowflake mani was disastrous!)...


China Glaze Ruby Pumps, french tip, frenchie, red, red tip, Christmas, snowflake, nails, nail art, nail design, mani
 Colors Used:  China Glaze - Ruby Pumps, Daisy Nail Lacquer - White Diamond

I really like the way these turned out!  Simple and elegant :)


I started by free-handing my tips with Ruby Pumps (1 coat over a red base).  I couldn't capture the sparkle in my photos but it really is like looking at Dorothy's slippers.  I then used light, short strokes to make my snowflakes.  It was a tad bit time consuming because I was doing my typical OCD, strive for perfection thing lol.  It all got top coated with Color Club Clear.


I'm definitely feeling the Christmas spirit this year.  I can't wait to get our tree!


What are you most looking forward to this holiday season?

Until next time!

Stef <3

Friday, November 22, 2013

Shining Bright Tonight

Hello, lovelies!

I have a new indie brand that I am currently head-over-heels for and I want to share it with you! (*disclaimer)...


Spellbound Nails Carnival Lights, glitter, black, black tips, french tips, frenchie, red, indie polish, nail polish, nails, nail art, nail design, mani
Colors Used: Julep -Demi, Spellbound Nails - Carnival Lights, Sinful Colors Nail Art - Time Off

For reals...  I LOOOOOVE Spellbound Nails!!  I stumbled across Spellbound Nails back in May when I purchased the Alice in Wonderland duo set.  I was blown away by the quality of the polishes and I haven't looked back!  I really do feel like Ashley puts out an amazing product...

I started with a dark red base, Julep's Demi.  I then applied one coat of Carnival Lights.  From what I can see, Carnival Lights is a mix of red, pink/fuchsia, black and silver holo glitters (beautiful!).  I then used my Sinful Colors black striper and painted my "V" french tip.  I topped it off with Color Club Clear :)

Oh the excitement !!!!!!!


I'm sorry I've been MIA this week.  I'm hoping things will calm down and I can get back to my regular blogger programing haha.  I have sooooo many pretties I want to share with you :D

Until next time!

Stef <3

* This product was purchased by me for review.  I received no payment or other compensation for the review of this product.  The opinions stated here are completely my own.  The contents of this review are based on my direct experience with this product. 

Wednesday, July 3, 2013

RW&B Brushstroke Frenchie

Good evening, dolls!

I have a quick post to share with you and then I have to dash off to the kitchen to prep food for tomorrow's 4th of July festivities :D

This mani was inspired by a post I read from Gnarly Gnails this week.  If you are unfamiliar with her blog, she's definitely worth checking out.  Not only do I think she's an awesome person, her nail art is off the chain!!   Anywhosy,  I felt like I'd been living under a rock when I saw her nails.  How had I never seen/though of this technique before??  While I don't think I mastered it (I was falling asleep while painting lol), I do like the way it turned out...


red white and blue, 4th of july, brushstroke, french, frenchie, nails, nail art, nail design, mani
Colors Used: Sinful Colors - Ruby Ruby, Sally Hansen - White On, Love & Beauty - Cobalt, China Glaze - Fairy Dust

First and foremost... I've lost my ability to make clean french tips and that makes me sniffle :(  I know that I'm just out of practice, I need to get my groove back haha.


 I think my favorite part is that the tips look distressed, which I always find cool ;)


 I don't have much to add.  You can learn more about this technique and how it's done by checking out Gnarly Gnails' blog.

Until next time!

Stef <3

Tuesday, June 25, 2013

KKCenterHK White Heart Studs Review

Hello hello hello!

It's been a quick minute since I've posted, but I seriously have had no time available to devote to blogging *cries*.  With summer camp having started at my work and my sister-in-laws wedding right around the corner... I've just been too pooped to pop.  That and catching up with friends who finally have free time not that they're on summer vaca *sigh*.  I'm forcing myself to post because I don't want to forget how lol...

Well, today I have a product review... woohoo!!  I was contacted by and online nail/beauty store called KKCenterHK.  They had a plethora of products available for me to pick from and then sent me 2 samplings.  I'll be sharing one of them with you now...


KK Center HK, product review, hearts, studs, white, french manicure, funky french, frenchie, nails, nail art, nail design, mani 
Name: 6mm White Heart Studs
Item #:  NNAIL-DRN628         
Quantity: Approx 50 pcs/pack   
Cost: $5.00 USD                       

KK Center HK, product review, hearts, studs, white, french manicure, funky french, frenchie, nails, nail art, nail design, mani

When I first picked these out I was afraid that they might be a little too big (I've never previously ordered studs).  I was pleasantly surprised by their size!  They are metal studs with a matte-ish, white, painted finish.  The paint is only on the top side, while the underside is silver.


I am definitely one of those ladies that has trouble wearing decor that sticks up off of  my nails.  I'm a picker and will pick and pick immediately after taking picture. These are so flat and smooth, I don't even realize I have them on.  I did have to slightly bend the studs so that they would lay with the curve of my nail and not stick up on the side, but it was easy enough to do.  more than anything I just didn't want it to snag on things later.


For those who are curious (and love details haha), I didn't need nail glue for these lovelies to stay on.  I pressed them down while my topcoat was wet.  I then waited until it was dry and applied another coat of topcoat to seal the stud.  I had these on for about 3 or 4 days before the paint of the heart started wearing away, mostly at the pointed end.


Overall I very much enjoy these studs.  They're cute, easy to work with and the neutral color means it will go with any mani wonderfully :)
 

How do you all feel about studs?  Love 'em, hate 'em, haven't tried 'em?  I'd love to hear what you think!

Until next time!

Stef <3


* This product was provided to me for review.  I received no payment or other compensation for the review of this product.  The opinions stated here are completely my own.  The contents of this review are based on my direct experience with this product.


Sunday, May 26, 2013

Nailed It's Faded French

Happy Sunday!

Today's mani is inspired by a fabulous tutorial I saw on Nailed It.  I was planning on wearing this to church, but immediately mucked it up while at Target helping my sissy-in-law build her wedding registry.  By the time I got home, I was waaaay to tired to start over.  It was a lovely mani regardless lol...

Julep Audrey, Nailed It Faded French, frenchie, pink, white, ombre, nails, nail art, nail design, mani
 Colors Used: Julep - Audrey, Sally Hansen - White On


 An ombre french manicure?  What a great idea!


I do wish I had dabbed on a little more white polish to really differentiate between the 2 colors, but if you love doing an ombre mani... this is a cinch!


The down-side to this mani is that Audrey is so sheer that I had to use 3 coats for opacity.  That mean it took forever to completely dry.  which actually means it never go to completely dry because an hour after doing it I messed it up.  A couple hours after that, when I got back home, it was still pliable... I got peeved and took the whole thing of lol.


I'm going to try this look again next Sunday with a different pink polish.  I'm excited to see how it goes :)

A final thought... I wish it were Tuesday so that I can share my next TPC mani with you.  I am SOOOOO excited about it!! (Hint: It's for my "Whovians"!).

Until next time!

Stef <3

Tuesday, April 16, 2013

April Tri Polish Challenge - Day 1

Hello, lovelies!

Today marks the start of the April Tri Polish Challenge.  The Crumpet started this challenge last month and you can find the details or her blog :)  This months colors are pink, orange and turquoise.  I will be using polish that I received as a gift from my mother-in-law over the weekend...

Color Club, Poptastic, Jackie OH!, Koo-Koo CaChoo, Edie, wavy, frenchie, funcky french, pink, orange, turqoise, April, Trip Polish Challenge, nails, nail art, nail design, mani
Colors Used: Color Club - Jackie OH! (pink), Edie (turqouise?), Koo-Koo CaChoo (orange)

Let me start off by saying the formula on these polishes... amazing!!  They're almost 1 coaters.  They came in the Poptastic pack, but I have a feeling Edie is from the Electro Candy collection.  Either way, I love my new polishes!!


The wavy design was inspired by a ring that my hubby gave me for Christmas 2 years ago.  It's a very unique ring.  He done did good lol.  So, I achieved this look using my striping brush.  I found that keeping the brush stationary in one hand and rolling my finger/fingernail on the other hand was extremely helpful.


My only complaint is that I made the orange wave on my ring finger to thick.  A little irritating but oh well!

Please take a look at the wonderful manis from the other challenge participants :D

Until next time!

Stef <3