Showing posts with label Studs. Show all posts

Wednesday, November 26, 2014

Moroccan Tile Nial Art

Hello loves!

Tonight's late night mani was inspired be the oh-so-fabulous Jessica of @lalalovenailart.  I've had the pleasure of meeting Jessica in person and she is just awesome :)  She created this look back in August and I've kept it lingering in the back of my mind as a must-do.  I finally got around to it last week...

 Colors Used - She Nail Polish - Dirty Red, Salon Perfect - Oil Slick, Acrylic Paint, Mentality Matte Top Coat

Jessica got inspired by some Moroccan tile she saw on the internet when she did her mani and I loved it.  I ended up choosing a color palette that gave this look a darker, more Gothic tone... but it still works right? ;)


I started with 2 coats each of my base colors and then with acrylic paint, I free-handed my pattern.  Using top coat and a dotting tool I applied my studs and then everything got topped with Mentality Polish Matte Top Coat.

I think I love this one <3


I hope you (in the States) have an amazing Thanksgiving!  I plan on gaining 10 pounds lol.

Until next time!

Stef <3

Monday, April 14, 2014

The Spellbondage Collection

Good evening lovlies!

Two posts in one day... wowza!!  I'm feeling inspired and I finally have a little free time, so I'm playing catch up haha.  Tonight I wanted to share a new collection from Spellbound Nails...


Ashley sent me some unbelievably gorgeous polishes for review!  These are from her new Spellbondage Collection.  I had a fabulous time tossing around name ideas with her and I love the tongue in cheek  approach that she took :)

Black Leather Thigh High

This is a stunning black jelly with a mix of blue, black and green glitters.  I pared it with some gold spikes that Ashley sent along for fun ;)  Shown is 3 thin coats with topcoat.

 Red Hot

This is a fabulous bright red jelly with a mix of red, gold and orange glitters.  I took this mani on a girls trip to wine country last weekend because this polish is just soooo pretty!  I paired it with some Fingr's nail stickers that I happened to have stashed away :P  Shown is 3 thin coats with topcoat.

Too Sexy for Blue

My personal fave, this polish is a gourgeous blue jelly with a mix of blue, gold and silver holo glitters.  I'm thinkin' I need to get myself a big bottle of this beauty because I want to wear it all the time!  It's absolutely stunning in the sunlight; perfect for summer :D  I paired it with a simple corset accent nail that I thought was fitting ;) Shown is 3 thin coats with top coat.

The Spellbondage Collection is available in individual bottles ($8) along with full ($23) and mini ($13) sets.  they can be purchased from the Spelbound Nails shop.

Until next time!

Stef <3


* This product was provided to me for review.  I received no payment or other compensation for the review of this product.  The opinions stated here are completely my own.  The contents of this review are based on my direct experience with this product.

Friday, March 28, 2014

It's My Golden Birthday!

Hello lovelies!!

Well, today is my golden birthday!!  What is a golden birthday you ask?  It is when your age and birth date are one and the same.  I am now 28... it's March 28th... you get the picture lol.  So I've decided to celebrate in style with my favorite ladies, The Golden Girls :D


 Colors Used: B Squared Lacquer - White Lights, Shimmer Polish - Tracy

This is actually a pretty simple mani.  I used a B Squared Lacquer's White Lights (a white crelly with gold glitter) and Shimmer Polish's Tracy as an accent nail.  As with the other Shimmer's I've reviewed in the past, I was blown away by Tracy!  I used 2 coats over a gold base and it is completely opaque!!  I think Cindy has truly defined the "glitter bomb"... holy cannoli!!  The studs came in a kit from Nail Art Society :)


 The Golden Girl decals are from Nail Spin.  Aren't they so cute??!!  I actually purchased a sheet of 15 decals of varying portraits of the ladies, but I couldn't chose between them so I used the group photo.  It's ever so blurry but I don't really care... I know who they are and that's what counts lol ;)

Happy, happy, joy, joy!!!


I hope you all have a fabulous Friday and a wonderful weekend!

Until next time!

Stef <3


*Shimmer Polish's Tracy was provided to me for review.  Nail Spin's decals were purchased by me for review  I received no payment or other compensation for the review of these product.  The opinions stated here are completely my own.  The contents of this review are based on my direct experience with these product.

Wednesday, February 12, 2014

Mix 'n Match with Pipe Dream Polish!

Hello lovelies!

I have had absolutely no time to do my nails this past week so I'm pulling a mani out of the vault today.  This is a skittlette I did a few weeks ago when I was desperately in need of some bright, colorful cheeriness...

 Colors Used: Zoya - Robyn, Daisy Nail Lacquer - White Diamond, Love & Beauty - Strawberry, China Glaze - Celtic Sun, Pipe Dream Polish - Zappin' It To Ya

This mani is mostly based around this awesome glitter topper that I bought from April at Pipe Dream Polish.  It's called Zappin' It To Ya and it's a mix of neon pink, green, blue and yellow glitters of varying sizes.  I tried to find polishes in my collection that closely matched and I think I did a decent job haha. 


 I haven't done a striped accent nail in for-eh-ver; I forgot how much I like them!  I also decided to use a bow charm that I bought from Hex Nail Jewelry.  Overall I'm really pleased with this one :)


I'm dreaming of warmer days that involve a vacation from life and lots of polish... *sigh*...  Lol happy Wednesday!

Until next time!

Stef <3


* These product were purchased by me for review.  I received no payment or other compensation for the review of this product.  The opinions stated here are completely my own.  The contents of this review are based on my direct experience with this product.

Monday, January 6, 2014

It Feels Like Spring!

Hello, hello!

It's been a week since my last posting... eep!  I actually decided to take time away from blogging and focus on my family and time with my husband.  It's important to prioritize from time to time right?  Lol, I've also been taking this down time to get my nails back into tip-top shape.  I'm currently rocking shorties, but the feel strong which is far far better than where they were a month ago!  All of this is the reason why I'm pulling some nail art from the vault...


Revlon Apricot Nectar, simple, elegant, spring, cream, creme, flowers, acrylic flowers, beads, studs, soft, easy, coral, orange, nails, nail art, nail design, mani
 Colors Used: Revlon - Apricot Nectar (scented)

The weather in Southern California is so gorgeous right now (sorry to all my snow bunnies!) and I just thought this mani is a good reflection of how I'm feelin' ;)


 I started with 3 thin coats of Apricot Nectar.  this polish is from Revlon's new-ish line, Parfumerie.  Scented goodness!!  This polish (when dry) smells a lot like a creamy, fruity candy.  I really like it.  I had to use 3 coats because it is ever so streaky, but I didn't mind... it's gorgeous!  I then used some acrylic flowers and beads that I found at Sally's Beauty Supply.  Really simple and pretty :)

 *sigh*


I promise now that the holidays are over I will get back on a more regular posting schedule.  I've got lots of goodies to share with you :D

Until next time!

Stef <3

Tuesday, December 24, 2013

Santa's Coming!

Good evening, dearies!

With less than 30 mins until it's officially Christmas (in California), I thought I would share a mani I did a few days ago using Shimmer Polish's "Cindy" (*disclaimer)...

Shimmer Polish Cindy, Santa, Christmas, red, glitter, glitter bomb, nails, nail art, nail design, mani
 Colors Used: Shimmer Polish - Cindy, Konad - White, Sinful Colors Nail Art - Time Off, Avon - Gold Glimmer

I started with 2 coats of Cindy over a red base.  Cindy is a compacted red glitter polish in a red jelly base.  It applied with perfection!  I think the thing I love most about Shimmer's are that they dry with little to know bumps/lumps/grit after top coating.


I then did a simple Santa Suit on my ring finger using Konad White.  I know that this polish is made for stamping but... well, I just suck at stamping lol.  It's absolutely great for nail arting over glitters so that is it's new purpose in my collection ;)  I added a belt using a Sinful Colors striper and the gold with a nail art brush.  I top coated with OPI Rapi-Dri.

Eeeeee I love it!!


Merry Christmas errbody :D

Until next time!

Stef <3

* This product was provided to me for review.  I received no payment or other compensation for the review of this product.  The opinions stated here are completely my own.  The contents of this review are based on my direct experience with this product.

Tuesday, November 19, 2013

Naughty Nails?

Good morning, dolls!

It's been a crazy couple of days for me (and from the sounds of it, it's only going to get crazier)!  It's the reason i have been unable to post... or do my nails... *sigh*.  So , I'm pulling one out of the vault for you today :)

Sinful Colors Whipped, OPI Goldeneye, cheeta print, leopard print, matte, matte black, animal print, stud, gold, gold stud, black and gold, nails, nail art, nail design, mani
 Colors Used: Sinful Colors - Whipped and Nirvana, OPI - Goldeneye

This is a really basic mani that I ended up loving a lot.  I'm not a huge fan of animal prints in general, but I've made the exception for nail arting because it's pretty cool lol.  This mix of print and "leather" does feel a bit wild/risque to me ;)


I started with Whipped, which is from the SC Leather Luxe collection.  It is my favorite black matte polish... ever.  Loves it so much!  Anywhosy, there's 2 coats of Whipped applied.  For my ring finger, I did 3 coats of Goldeneye over a gold base.  i then used my dotting tool and striping brush to create my print.  The gold stud was an after-thought and it was applied with a dab of nail glue :)


Rawr!


I hope all is well and I'm sending out virtual hugs :D

Until next time!

Stef <3

Friday, November 15, 2013

Mix It Up!

 Hello, dolls!

Quick post before I rush off to my Friday activities :)

NOPI Khloe Had A Little Lam-Lam, Teal, Dark Teal, Dark Green, Glitter, Accent Nial, Indie, Indie Polish, Pretty Jelly Ghouls Night Out, Stud, Studs, Gold Studs, Simple, Nails, Nail Art, Nail Design, Mani
Colors Used:  NOPI - Khloe Had A Little Lam-Lam, Royal Nail Icing - Sweet Concrete, Pretty Jelly - Ghouls Night Out

This one is pretty simple.  Not much nail arting involved haha,


2 coats of polishes for my bases.  One coat of Ghouls Night Out over black on my ring finger.  Used the bottle brush to paint the strip down the center of my middle finger.  I found the square studs in a nail wheel I got at H&M.  All topcoated with Color Club Clear.


Easy-peasy!


I'm sorry this post is so short (I gots to go)!  I hope you all have a fab Friday :)

Until next time!

Stef <3

Thursday, November 14, 2013

A Simple Fall Mani

Hello, hello!

A quick post today featuring a  polish that I had no clue what to do with lol...

 Colors used: Julep - Brielle, Spellbound Nails - You're a Virgin??

Sooooo I recieved a polish from Julep that I wasn't really crazy about, but I was determined to make it work.  


I started with 2 coats of Brielle, a gorgeous burnt orange that's just not so gorgeous on me haha.  Brielle is practically a one coater, the formula is amazing.  I then painted one coat of You're a Vrigin?? over a black base.  Last I added a small black stud to tie it all together.  Top coated with Color Club Clear.


 I like that the glitter and orange ended up complimenting eachother.  It was a good excuse to wear it again ;)

Wishing you all a very happy Thursday!

Until next time!

Stef <3

Wednesday, November 13, 2013

October Nail Art Society Box

Good morning, dolls!

Today I want to share a new-to-me subscription box that I've signed up for.  It's called Nail Art Society...

 Colors Used: Jessica - Black Matte, Love & Beauty - Purple, Zoya - Morgan, Orly - Mayhem Mentality

So, Nail Art Society is designed to send out all of the materials you need to create some pre-designed mani's.  It comes with an instructional card that includes a bio of the nail artist that created that month's design.  Pretty cool right?

My ring finger follows the design pattern for October, but I decided to do some sponging and stickering on my middle finger.  The sticker turned out to be super bumpy and obnoxious, so you only get 2 pic today lol.


 I really love the studs that came in the box.  The matte polish isn't my favorite (not flat enough for me :\).  My biggest issue is that I didn't receive my box until a week into November (even tho I ordered it on the 1st of Oct.).  This was after a SECOND payment got taken out of my account for the month of November.  2 payments and no boxes makes me a cranky lady. 

 I'm hoping to have a more positive experience with this in the future.  A lot of my fellow nail bloggers that I love are on their team of "Expert Nail Artists".

Do any of you receive NAS boxes?  How have your experiences been?

Until next time!

Stef <3

Thursday, November 7, 2013

It's Movember!

Hiya dearies!

It's "No Shave November" or "Mustache November/Movember" and I thought this would be the perfect time to share some cute studs I received from KKCenterHK! (*disclaimer)...

Rimmel Black Satin, suite and tie, mustache, stud, Movember, No Shave November, Prostate Cancer Awareness, Men's Cancer Awareness, sophisticated, gentelemen, nails, nail art, nail design, mani
 Colors Used: Rimmel - Black Satin, Daisy Nail Lacquer - White Diamond, Sinful Colors Nail Art - My Day and Bad Chick


I free-handed my designs using stripers and dotting tools.  The suit is a lot easier than it looks (mayhaps it's time for another tutorial?).  After completing my polish designs I topcoated.  I then put a dollop of nail glue in the place I wanted my mustache stud.  With some tweezers and a little fenagling, I applied my stud.  Easy peasy!


This mani makes me feel sophisticated lol. 

Name: N.Nail Studs Lovely Black Beard 8mm X 3mm Nail Art Decorations
Item #: NNAIL-DRN741
Quantity: 5 Pcs
Size: 8mm X 3mm
Cost: $4.50 USD
These studs can be found on KKCenterHK's online store!
http://www.kkcenterhk.com/

 For those who don't know about Movember, it is Prostate Cancer/Men's Cancer Awareness Month.  Prosate cancer is a major killer for men in recent years.  Both my grandfather and father were diagnosed with it.  Thankfully my father's was discovered early (via my mother's persistence that he go to the doctor).  Unfortunately my papa wasn't so lucky.  Ladies, please encourage the men in your life to go and get checked.  What will be a momentary uncomfortableness for him could possibly save his life.  Love to you all!

Until next time!

Stef <3

* This product was provided to me for review.  I received no payment or other compensation for the review of this product.  The opinions stated here are completely my own.  The contents of this review are based on my direct experience with this product.

Monday, November 4, 2013

Nailed Kit Review

Hello, lovelies!

Yikes... I can't believe it's been a week!  I'm so sorry, I've been a little busy in life.  Then I took advantage of the weekend to just relax and have a good time with freinds and family.  Impromptu blog vaca I guess lol.  But I'm back and have so much to share with you this week.  Let's get started!

Today I have a fun DIY nail kit to show you (*disclaimer)...

  
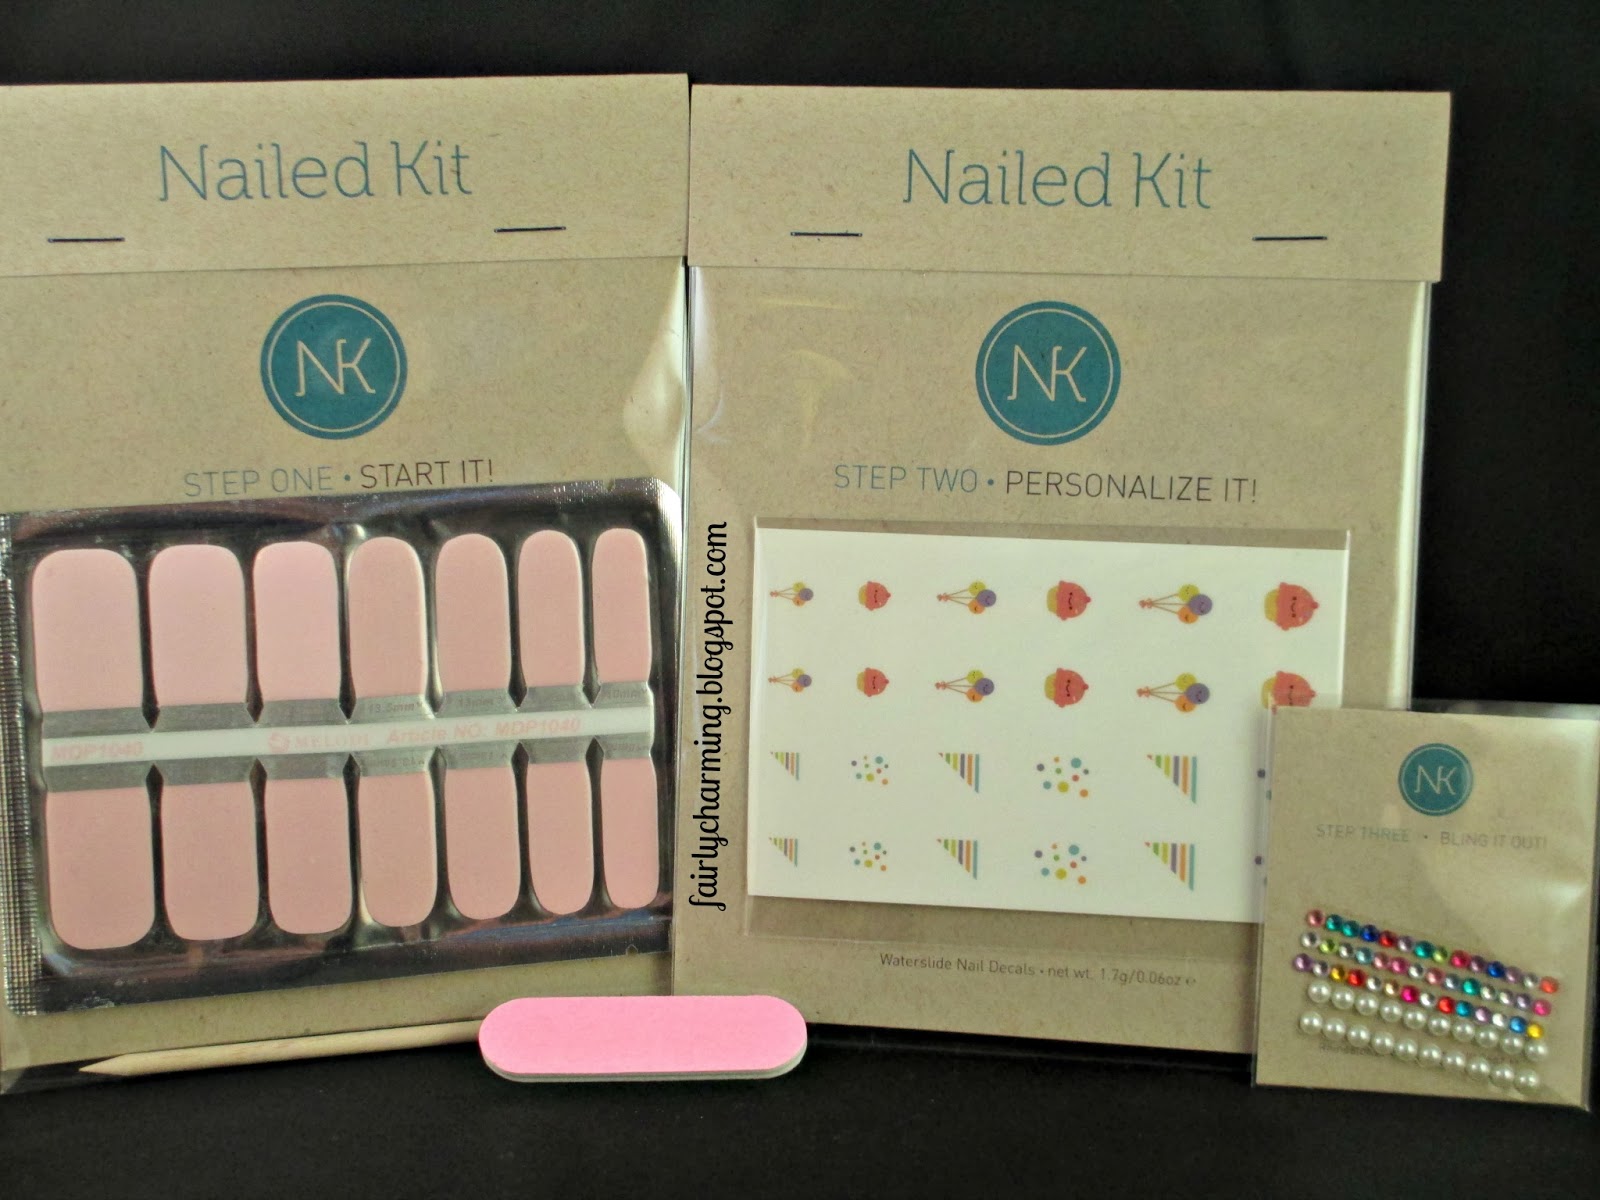
Nailed Kit Is just what it sounds like... A nail art kit!  It includes all of the materials one might need to create some fun/fabulous/adorable nail art.  There are quite a few styles to choose from, but I decided to go with the Cupcake Birthday Kit...

Nailed Kit, DIY nail art, subscription box, birthday, cupcake, all in one, nails, nail polish. nail art, nail design, mani

Inside the kit you will find nail polish strips, water decals, rhinestone/studs, an emery board and an orange stick.  Each packaged item has instructions on the back for application.  It's pretty fool proof... well, excpet for this fool lol.
 
Nailed Kit, DIY nail art, subscription box, birthday, cupcake, all in one, nails, nail polish. nail art, nail design, mani

The instructions for the nail strips said to stretch them over your nails.  Well, these bad boys (girls?) are really pliable and I actually LOVED the way that they looked.  Very much as if I had polished my the nails myself.  But... I was a little over zealous with the stretching and a few minutes later when I was ready to take some pictures, the strips shrunk back a bit and my nail line was peaking thru at the tips.  I'm a big dope!


So I pulled out the closest polish shade I could find (Color Club Endless) and all was right with the world lol.  The other polish pictured, for those who are curious, is Spellbound Nails Upelkuchen (birthday cake batter, I thought it was fitting haha).


I did a second mani I wanted to show the versatility of this box.  Polishes used here were Jesse's Girl Sprink Break, Sally Hansen Blue-Away and Lush Lacquer Clowning Around.  The one recommendation I will make when using this kit... the decals are pretty sheer so a really light base (I chose white) will help the color to pop.


There are so many options with this kit and this company.  You want to throw a nail party?  Awesome!  Get some food and drink and order a few kits for your gal pals... party hardy!  Or maybe it's a baby shower?  A bachelorette party?  They've got you covered.  You can also just buy a kit for yourself and create multiple manicures.  Aaaaand if you just want the cute little decals... you can do that too!  If you really love it, there are subscriptions boxes available as well.  So many choices!!  Nailed Kit is a really great option for anyone who is wanting to take the plunge into nail art :)

You can find out more about Nailed Kit via their website.


What do you guys think about this kind of box?  Let me know in the comments below :)

Until next time!

Stef <3

* This product was provided to me for review.  I received no payment or other compensation for the review of this product.  The opinions stated here are completely my own.  The contents of this review are based on my direct experience with this product.

Monday, October 21, 2013

Playing with Studs

Hello dolls!

I'm pulling a mani out of the vault for you today.  I decided to take a little blogging break over the weekend and then I ended up being so busy that I really didn't do any good nail art-ing lol.  So onto the pictures we go!

Kleancolor Signature Lavender, black studs, black diamonds, triangle, pyramid, black, purple, nails, nail art, nail design, mani
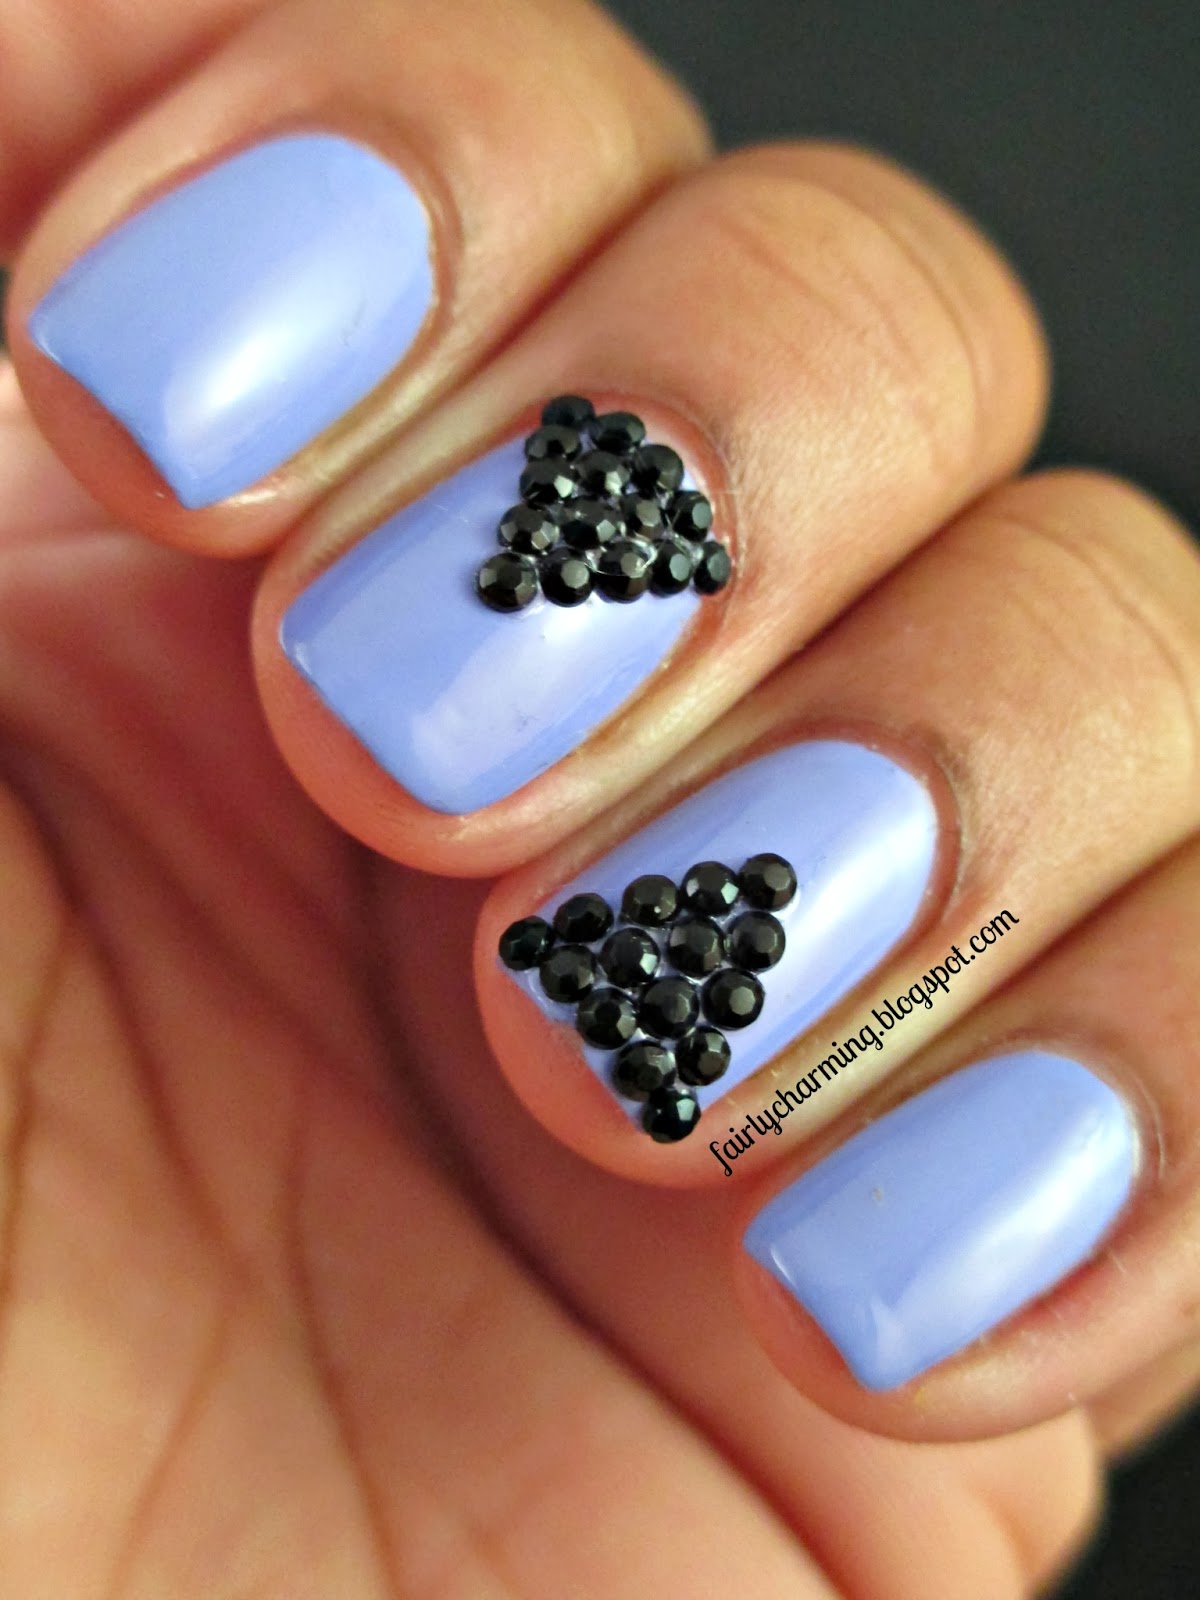
 Colors Used:  Kleancolor - Signature Lavender

This is a pretty simple one :) I started with 2 coats of Signature Lavender and I then top coated my nails...


I then used some black studs that I got in an H&M nail art wheel and, with a dotting tool and more topcoat, started stacking them pyramid/grape style.  5,4,3,2,1.  I let the studs set and viola!


These didn't stay on my nails for very long because I wound up picking them off lol.  I really don't do well with things sticking up off of my nails :\


I hope you all enjoyed this post!  I have at least one more halloween mani planned but that won't be posted until closer to the holiday.  This week I'm going to clear some more manis out of the vault (which means you'll be seeing some interesting stuff?  lol).

Until next time!

Stef <3