Showing posts with label Plaid. Show all posts

Thursday, November 27, 2014

Thanksgiving Gone Flannel!

Hello dolls!

Happy Thanksgiving to you all!!  I have a quick post to share with you today.  I haven't had a tone of time to spend on my nails this week, so I decided to keep my mani simple...

OPI, Christmas Gone Plaid, Flannel, Plaid, Nails, Nail Art, Nail Design, Mani
 Colors Used: OPI - Christmas Gone Plaid, Sally Hansen - White On, Acrylic Paint, OPI - Matte Top Coat

I simultaneously love and hate this mani lol.  I'm obsessed with this nail color right now; it's just perfect.  It applies like butter!


 I started with 2 coats of my base colors, with white for my accent color.  I painted 3 vertical green  stripes (center and both sides) with Christmas Gone Plaid and once it set I then painted 3 horizontal white stripes with acrylic paint.  To get the flannel look, I used a detail brush and went back with my green polish to apply diagonal lines in alternating boxes.  Doing this with nail polish was difficult, not gonna to lie.  I would recommend using acrylic paint for small detail work like this. But, alas.  

I topped my accent nail with OPI's Matte Top Coat and the rest of my nails with a Salon top coat I get from my local nail supply store

A little messy, but I'll take it!


Well, I'm off to go watch some Supernatural with the hubs before we head over to my parents house for family craziness lol.  Have a happy and blessed day :)

Until next time!

Stef <3

Monday, May 19, 2014

Shimmer Polish -Taylor

Hello lovlies!

I have another awesome Shimmer Polish to share with you today :)  This is Taylor and man oh man is she a beaut!

 Colors Used: Shimmer Polish - Taylor, China Glaze - Turned Up Turquoise, Orly - Dazzle, Orly Instant Artist - Grape

When I unwrapped this bottle of polish I was in awe.  A deep purple (I'd call it eggplant) jelly base with a mix of green, red, blue and purple glitters... agagagagaaahh!!


Pictured is 2 coats of Taylor over a dark purple base.  For the accent nail, I used striping brushes to do a negative space plaid design.  I threw in the heart for funsies ;)  All in all I like this look.  This is probably a color I'll pull out again around Halloween; it's a little too dark for my summertime madness haha.


This and many other amazing glitter polishes can be found in Shimmer Polish's Etsy shop :)

Until next time!

Stef <3


* This product was provided to me for review.  I received no payment or other compensation for the review of this product.  The opinions stated here are completely my own.  The contents of this review are based on my direct experience with this product.

Monday, March 17, 2014

Happy St. Patty's Day!!

Hello lovelies!

I'm getting this post in just under the wire lol.  It's been a very very very long day but I just have to share this before bed.  Because... well, it won't be St Patricks day tomorrow!


Colors Used:  A whole lot!

I'm too tired to look up all of the polish names... my spologies!  The clover is actually a sticker from a company called "Make It Stick".  I bought these stickers about a month ago with the full intent of wearing them on St. Patty's Day; I figured gold would be more fun that green.  Really, this whole mani kind of revolves around the clover...


I achieved the plain with a steady hand and a black striping brush.  For the rainbow, I used the same technique that I used with my neon swirly rainbow from last summer.  The gorgeous glitter bomb is Shimmer Polish "Kelly", a super pretty mix of green and gold glitters!

Yaaaaayyy!!


I hope you all had a very safe and happy holiday :)

Until next time!

Stef <3

Monday, September 30, 2013

Introducing Royal Nail Icing

Hiya dolls!

I meant to have this post up on Saturday but life seriously got in the way :\  Today I would like to share a new indie brand with you.  The name is Royal Nail Icing and it is a project that 10 year old JaJa and her mother started....


Royal Nail Icing, Sweet Concrete, Strawberry Lava, plaid, patchwork, heart, quilt, grey, fuchsia, pink, crelly, nails, nail art, nail design, mani
 Colors Used: Royal Nail Icing - Sweet Concrete and Strawberry Lava, Daisy Nail Lacquer - White Diamond

I've been wanting to do a plaid or patchwork mani for a while now (it's been so long!) so when JaJa asked me if I would create some nail art using her polishes, I knew exactly what I was going to do :)


 I was quite surprised at the ease of which these polishes went on.  I'll get into the formula a little bit later, but I will say that I think I may have found a new fave indie brand of polishes...


Look at how cute the packaging is!  Very, very sweet.
Royal Nail Icing, Sweet Concrete, Strawberry Lava, grey, creme, fuchsia, pink, crelly, nail polish, indie, indie brand

I really love the bottles.  I think the crown is absolutely adorbs haha.  So let's talk formula....

Sweet Concrete is a creme grey polish.  I would describe it as a squirrel/rain cloud grey.  It applies beautifully in 2 coats for opaqueness.  It's not streaky at all
 
Royal Nail Icing, Sweet Concrete, grey, creme, nail polish, indie, indie brandRoyal Nail Icing, Strawberry Lava, fuschia, pink, crelly, nail polish, indie, indie brand

 Strawberry Lava is a pink/fuchsia crelly.  It too was really easy to apply.  2 coats would have sufficed but i had a teensy bit of nail line showing thru so 3 coats did the trick for me.  This polish reminds me of a juicy watermelon.  It just looks delicious!

Both of these polishes can be found on Royal Nail Icing's website for $6.50.  A great buy for any polish enthusiast who wants to expand their indie collection without breaking the bank lol.

 One last shot of the nail art ;)

I hope you all have a fabulous week!  I promise not to be a stranger :P

Until next time!

Stef <3

* This product was provided to me for review.  I received no payment or other compensation for the review of this product.  The opinions stated here are completely my own.  The contents of this review are based on my direct experience with this product.

Tuesday, August 27, 2013

KKCenterHK Plaid Bow

Good morning, dolls!

I have a couple of product reviews to share with you today :)  First up is a product that I received back in June.  I tried it, took photos, edited them and then never got around to posting them *slaps hand*....

KKCenterHK, Plaid Bow, Checkered Bow, brown, tan, nude, red, black, white, burberry, nails, nail art, nail design, mani

Isn't this bow super cute??  I decided to stick with the "Burberry-esque" design and I really love the way it turned out.


 Now, as adorable as these are, I have to say I had a hard time making them stay on.  Because it's such a large bow, there is a lot of exposed free edge (as you can see above).  I tried nail glue, but after about an hour I snagged it on something and it popped off :(  I think when I re-use them again, I'm going to put them closer to my cuticle so that they are more secured in place.


Name: BLUESEA Bow Shaped Brown With Checkered Nail Art Decorations
Item #:  BLUESEA-CB01E
Quantity: 2 Pieces
Cost: $4.00 USD
       
These bows, and others like them, can be found at KKCenterHK's online store!


I'll ba back later this afternoon/evening with another product to share with you :)

Until next time!

Stef <3

* This product was provided to me for review.  I received no payment or other compensation for the review of this product.  The opinions stated here are completely my own.  The contents of this review are based on my direct experience with this product.

Thursday, May 2, 2013

Bright Plaid

Good morrow, darlings!

So today's mani is one that I completely forgot I did.  I think I did it last sometime last week but I'm not positive.  I do remember it was a night when I was polishing like crazy and kept painting, snapping (pictures), and removing haha...


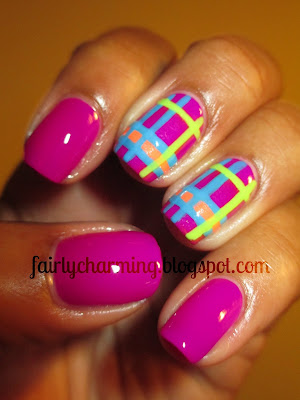
Color Club Mrs. Robinson, purple, plaid, bright, neon, nails nail art, nail design, mani
 Colors Used: Color Club - Mrs. Robinson, Love & Beauty - Light Green, JLB - Aruba Blue, Bonita - Neon Citrus

I have been told for the past several months that I should watermark my photos.  And every single person who's said it is absolutely right.  It is an annoying but necessary evil because there are dishonest/daft people out there who don't give credit where it's due and steal others hard work *sigh*.  I'm sorry if that makes my pics less desirable for y'all :\


Well I started with 2 thin coats of Mrs Robinson.  I then striped Neon Citrus, Aruba Blue and Light Green (in that order) trying to keep my lines straight as possible.  My striping has kind of "meh" recently, I need to start doing it more regularly again...


I just can't get enough of bright polishes right now!  I know they're considered a "Summer Color" but I honestly could wear these all year long and not feel bad about it lol.

Welcome, welcome, welcome to my new followers :D  I've just added Bloglovin' to my list of ways to follow.  For those who are unfamiliar, Bloglovin' is a fantastic way to keep up with all of the blogs you love to follow.  Instead of having a ton of bookmarks in your web browser (I know some of you do!), you can have a nice little blog roll that keeps trak of posts you've read, liked, commented on, etc.  I recommend giving it a look-see.  Following me wouldn't be such a bad thing either ;)

Until next time!

Stef <3

Sunday, March 17, 2013

Happy St. Patrick's Day!!

I'm getting this post in just in the nick of time!  Hahaha hi there :)

I did this mani in a bit of a hurry but I'm really very pleased with how it turned out.  I literally got home from church, did my nails, took a 30 min cat-nap and then drove to a barbecue to celebrate my father in-law's birthday (which is today... which makes him the greatest leprechaun I know lol)...

St Patricks Day, rainbow, clover, pot of gold, plaid, green, gold, nails, nail art, nail design, mani

A little bit of everything :D

 Colors Used: Revlon - Mon Cherry and Mad About Mango, Sally Hansen -  Mellow Yellow, Green With Envy, Golden-I and White On, Essie - Mojito Madness, Love & Beauty - Green Tea, Julep - Annie and Bette, OPI - Goldeneye

Please ignore the glass of beer behind the polishes.  I'm feeling... festive ;)


I am one happy lady :D


Yay for St Patty!!

So I'm filling in for my boss at the beginning of this week.  I will try to keep up with my posts but I'm not making any promises :P

Until next time!

Stef <3

Wednesday, October 17, 2012

A Vampy Plaid?

Good mornin'!  How is everyone fairing this week??  I for one am ready for it to be Friday ;)

My post today is going to be short and sweet because... well, I'm just not that crazy about this nail art.  I had an idea in my head and I just don't think I executed it well.  It took about an hour for this inspiration to even come to me in the first place!  I'm a little rusty I guess :\

The idea I had in my head was a vampy plaid.  Like if Elvira were to suddenly decided she wanted plaid nails or something.  They came out a hot mess...

 Colors Used: Sinful Colors Nail Art - My Day (red) Time Off (black), Sally Hansen - Pumping Iron


 What I cannot stand is that the black pops off of the nail and looks like a weather vein/telephone pole!  It's seriously driving me crazy!!  

I feel compelled to fix it... right now... brb...


Yeeeaaaahhh... not any better.  Gaaaaaaahhhh!!!

C'est la vie hahaha.  Just a reminder that there's only a few more hours to get your entries in, so get to it ladies :D

Until next time!

Stef <3

Thursday, June 14, 2012

I'm A Little Scotch-Irish?

Not really.  Well, I might be on my father's side, but we're not 100% sure.

Hello!  Lol.  I don't really have a great way to put this down into words so I'm just going to make bullet points as to what inspired my mani and we'll go from there :D

  • I have always been intrigued with Scotch-Irish customs and traditions, even as a child.
  • I am beyond excited to see the new Pixar film "Brave" that's coming out next week.
  •  I am marrying into a Scotch-Irish family (most likely resulting in black kids with red hair lol).  I wanted to pay homage to their heritage <3
  • I am a little obsessed with plaid right now :P
  • Green is an excellent color on me, in my opinion, and I haven't worn the color in a while.
  • I needed more practice with a striping brush.
So here it is, my Scotch-Irish mani...

 Colors Used: Julep - Leah, E.L.F. - Party Peach, Sally Hansen - Mellow Yellow, Green With Envy and White On

I am in love with this mani.  Leah is the perfect green!  It painted on like a dream with 2 coats.  3 coats of the peach (which really is quite orangey) and then easy-peasy stripes.  If I didn't feel so compelled to change my polish daily, I would wear this for at least a week if not longer.

I topped this off with the fast dry topcoat that Julep sent to me in my June Mystery Box.  It smells extremely skunky and acidic to my nose, but it dries faster than any other topcoat I've used.  I am in love with it as well lol.

One last pic...

Julep, Leah, green, plaid, Scottish, Irish, Brave, nail art, design, mani
 Alright all, I'm going to enjoy my day off now!  Happy Thursday :)

Until next time!

Stef <3

Friday, June 8, 2012

A Plaid Mani Tutorial

Happy Friday everybody!  As they say, "There is no rest for the wicked!".  And I am certainly not an exception.  It's going to be a very long weekend :(

Well, today I have a tutorial for you!  The plaid mani seemed to be a pretty popular one and it's a fairly simple look to achieve.  Here is a pick of the one I did for this tut...


Here is what you will need:

  • Base Coat
  • Top Coat
  • 3 Nail Polishes
  • Striping Brush (if you don't own a striping brush, try an old liquid eyeliner brush?)
That's it!  I promise, this look is super easy to achieve :)  So here's what I did...

 Colors Used: Julep - Gloria, Sally Hansen - Green With Envy, Sally Hansen - White On

With spring winding down, I thought I'd use some springy colors to give it a pretty send off haha.  I really love this look and I have some ideas in my head for more color combos in the future :)  I started by applying my base coat.  I am currently using Triple Wrap Thickener by Nail-Aid.  It has not strengthened my nails like I thought it would by it definitely makes them harder than they are naked.


I then applied 2 thin coats of Gloria to the tips of my nails.  You don't have to worry about being perfectly neat and even when applying this.  You're going to cover it up with stripes later :P
 Then I applied 2 thin coats of a thick, off-centered, streak/stripe (using the polish brush of course).  Again no need to stress about it looking perfect.


Time for the striping brush!  With my brush I applied a stripe of Envy onto each nail tip.

After cleaning the brush off, I applied White On to the left of the large streak, overlapping the green stripe.  And then I painted two white stripes near the bottom of the nail.

I cleaned the brush a final time and applied Envy to the right side of the streak, overlapping the white stripes.

I finished it off with one coat of Out The Door and, voila!  A simple plaid mani :)


 I cannot express how much I love this look.  It's really fun and detailed without being a butt load of work, you know?  I hope that this tutorial is helpful to you!  Please let me know how you do with your own plaid mani's :)

I'll have a polish haul to share with you within the next week.  Aside from that I hope you all have a fabulous weekend!

Until next time!

Stef <3

Friday, June 1, 2012

Think Pink.. and Plaid!

It's Friday!  Yaaaaaaaayyyy!!!  :D  Lol good morning all!

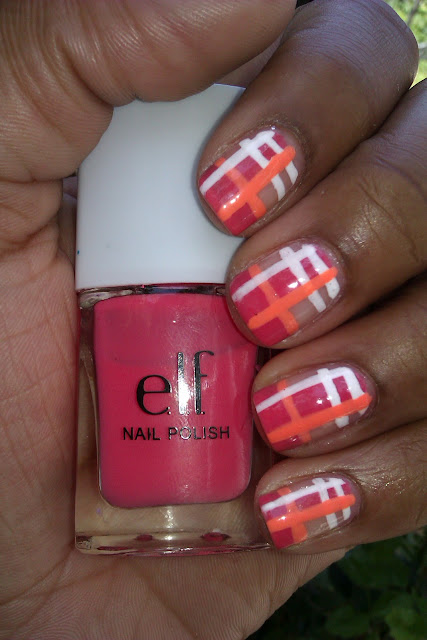
For today's mani I decided to attempt an actual plaid look.  A couple of weeks ago I did a plaid-ish mani, but really i was just layering stripes.  This attempt was different...

Colors Used: Elf - Flirty Fuchsia, Elf - Coral Dream, Sinful Colors - Snow Me White 

My striping abilities having been lacking as of late, so I was really excited when this turned out as well as it did hahaha.  

But of course it couldn't just stay perfect.  I don't know how I did it, but in the middle of the night I messed up my thumb :(


This made me very sad and a little irritable.  Alas... earwax!  A couple more pics...


Pink, peach, coral, white, plaid, nail art, design, mani

So there you have it!  What do you think?  I was contemplating doing a tutorial on this but I don't know if anyone would really be interested.  Let me know! :)

Until next time!

Stef <3

I almost forgot!  I broke my middle finger nail yesterday while making my bed D:  It hurt quite a bit but I fixed it with a silk wrap