Showing posts with label Color Club. Show all posts

Thursday, July 31, 2014

I'm Koo-Koo Cachoo over Summer Camp!

Hello dolls!

I have a a collaborative mani to share with you today.  I recently joined a group of beauty bloggers that focus on women of color.  I love polish on every person of every color, but it's been nice to connect with women who have the same questions/issues that I do as an ethnic blogger (especially color accuracy... can you say nightmare??).  Anywhosy, we are linking up today with a shared theme... the color orange!

 Colors Used: Color Club - Koo-Koo Cachoo, Colores de Carol - Summer Camp

When I found out the color we would use was orange, I knew exactly which polish I would be using.  Koo-Koo Cachoo is an amazingly obnoxiously bright orange that I am just crazy about haha.  I started with 2 coats and let it dry,


 I then pulled out a recent splurge of mine... Summer Camp!  As a first year director of my own camp, this was a must have for my collection.  It is very befitting of the constant chaos that is Summer Camp... I love it!  This is one easily applied coat :)

That's all I have to say about that...


Please be sure to check out the posts from my fellow Proud Beauty Bloggers of Color!


Until next time!

Stef <3

Saturday, July 19, 2014

A Summery Gradient

Hello lovelies!

I hope your weekend is going well :)  Today I have a simple gradient to share with you.  I did this a few weeks ago and never got around to posting it... oops!


 Colors Used: Colors Club - Flamingo, China Glaze - Son of a Peach, OPI - I Just Can't Cope-Acabana, Spellbound Nails - Pishsalver (Drink Me)

I just love gradients!  I have to resist doing them all the time lol.  There are some really great tutorials on the interwebs for gradient nail art.  I find what works best for me is a good make-up sponge (I prefer the triangles from Target) and being sure to blend the colors; not only overlapping the polishes when applying on the sponge but slightly shifting the sponges position up or down the nail as I dab :)


I started with a white base and let it dry.  Sponging over polish that is still tacky is a nightmare, trust me haha.  I then layered my 3 colors on a sponge and went to work.  I usually go over each nail 3 times to reach full opacity.  After clean-up (the worst part of doing this nail art, even if I tape off my cuticles :\) I applies my oh so favorite white glitter polish from Spellbound Nails, "Drink Me"

Woohoo!

Enjoy your weekend dolls, I know I plan too ;)

Until next time!

Stef <3

Wednesday, July 9, 2014

Nailspiration with Operatic Makeup

Hello lovelies!

I have a special post to share with you today.  A couple of weeks ago I saw some photos of some gorgeous makeup my dear friend Danielle did on a client.  Danielle is an Orange County/ Los Angeles based MUA that I have had the pleasure of singing/being wild with for a few years and I always blown away by the work that she does.  This particular look she did definitely conjoured up some nailspiration!


Let's start with the make-up first...

Colors Used: Urban Decay - Electric Palette (Urban and Savage)

I just love that purple!  And the hot pink adds some sass ;)  The palette that she used is filled with brightly pigmented shadows that I just drool over!

Anywhosy, this look got me thinking about the polishes I had in my collection that might be similar in shade and fun to mash up...

 Color Used: B Squared Lacquer - Body Electric and Royals, Color Club - Endless and Jackie OH!

This first polish that jumped to mind what "Body Electric" by B Squared Lacquer.  It's a white crelly with purple and hot pink hex glitters mixed in.


I then pulled out my other favorite B Squared, "Royals".  It's a gorgeous blurple jelly with holo glitters mixed in.  Color Club "Endless" and "Jackie OH!" are the pale and hot pinks I used.  I did a mixed drip/melt mani using a dotting tool and striping brush.

 I love!


I'm hoping Danielle and I can do more mash-ups like this one.  I love the challenge!

If you're interested in seeing more of Danielle's work, you can check her out via Instagram (@operaticmakeup).  If would like to book her for an event, you can email her at operaticmakeup@gmail.com :)

Until next time!

Stef <3


Saturday, November 23, 2013

Watermelon Tribal

Good morning, dolls!

I have a quick post for you today.  This is a mani that I did a couple of weeks ago, because I was in the mood for something bright.  I know it's Fall and the season of dark colors but... it gets so booooring!  Lol I need color in my life!

Nabi Pastel Green, Color Club Flamingo, green, neon gree, pink, neon pink, watermelon, tribal, nail poish, nails, nail art, nail design, mani
 Colors Used: Nabi - Pastel Green, Color Club - Flamingo, Sinful Colors Nail Art - Time Off

There is no rhyme or reason to this one.  I just sort of grabbed polishes and painted this was my end result haha.  

I have to say my SC striper is my new favorite nail arting tool.  I've had it for years and only just now am I realizing how fabulous it is!  It's super pigmented and so easy to work with.  I don't know if they're still sold in stores but if you find it, snatch it up ;)


I started with 2 coats of Nabi's Pastel Green.  I am not familiar with this brand at all, but I saw it in a bowl of polishes at this clothing store I frequent and thought it looked so much like pics I've seen of Lime Crime's Pastelchio (a long time lemming).  The formula is ok but the color... I just can't get enough!

I then applied a large stripe of Flamingo using the bottles brush.  After that I just went to town with the black triper.  I used a small dotting tool for my dots.  It was all topped with Color Club Clear.

Watermelon goodness ;)


Alright loves I have to skidaddle!  I have a date with The Doctor and musn't be late :D

Until next time!

Stef <3

Wednesday, November 6, 2013

It Might As Well Be Spring

Hello loves!

I decided to do a floral mani a couple of weeks ago because, altho it's Fall, California has not gotten the memo.  It's a shame because this is my favorite time of the year :(  We have been in the mid 70's to high 80's ever since the season started so I figured to heck with it!  Let's do a Spring-time mani!

Julep Janel, Color Club Gingerbread, spring, flowers, fuchsia water decals, nail decals, nails, nail art, nail design, mani
Colors Used: Julep - Nellie, Color Club - Gingerbread, Daisy Nail Lacquer - White Diamond

I'm not a huge fan of my free-handed flowers, so I decided to use some water decals I had lying around.  I paired it with a Julep polish that I'd received in the mail recently.


2 coats for each base color (technically 3 for my middle finger which had 1 coat of gold base and 2 coats of glitter).  I found the decals while digging thru a bin at my local nail supply store.  All in all a super simple mani!


I think I like it!


Is anybody else experiencing non-Fall weather?  It stinks lol.

Until next time!

Stef <3

Tuesday, November 5, 2013

I Liked It So I Put A Bow On it

Good morning, dolls!

I have a quick post for you today.  It features a new-to-me beauty,  It's just creamy coral goodness lol...

Color Club In Theory, coral, bow, chevron, accent nail, cute, girly, pink and white, nails, nail art, nail design, mani
 Colors Used: Color Club - In Theory, Sinful Colors Nail Art - Time Off, Daisy Nail Lacquer - White Diamond

In Theory is from Color Club's Fiesta Collection.  I picked up the set at Ross over a month ago along with the Kaleidoscope Collection and yea... it's taking me a cool minute to get thru them all ;)
 

I applied 2 coats both of In Theory and White Diamond.  I then free-handed the bow using my Sinful Colors striper and then filling it in with a nail art brush.  The chevrons are actually stickers I got in a mystery box from Julep.  I think it was just a one time thing that they did and I don't think they will be offering it for sale :\  If I hear differently, I will let you all know...


Not the perfect bow but I'll take it haha.

Wishing you all well...

Until next time!

Stef <3

Monday, November 4, 2013

Nailed Kit Review

Hello, lovelies!

Yikes... I can't believe it's been a week!  I'm so sorry, I've been a little busy in life.  Then I took advantage of the weekend to just relax and have a good time with freinds and family.  Impromptu blog vaca I guess lol.  But I'm back and have so much to share with you this week.  Let's get started!

Today I have a fun DIY nail kit to show you (*disclaimer)...

  
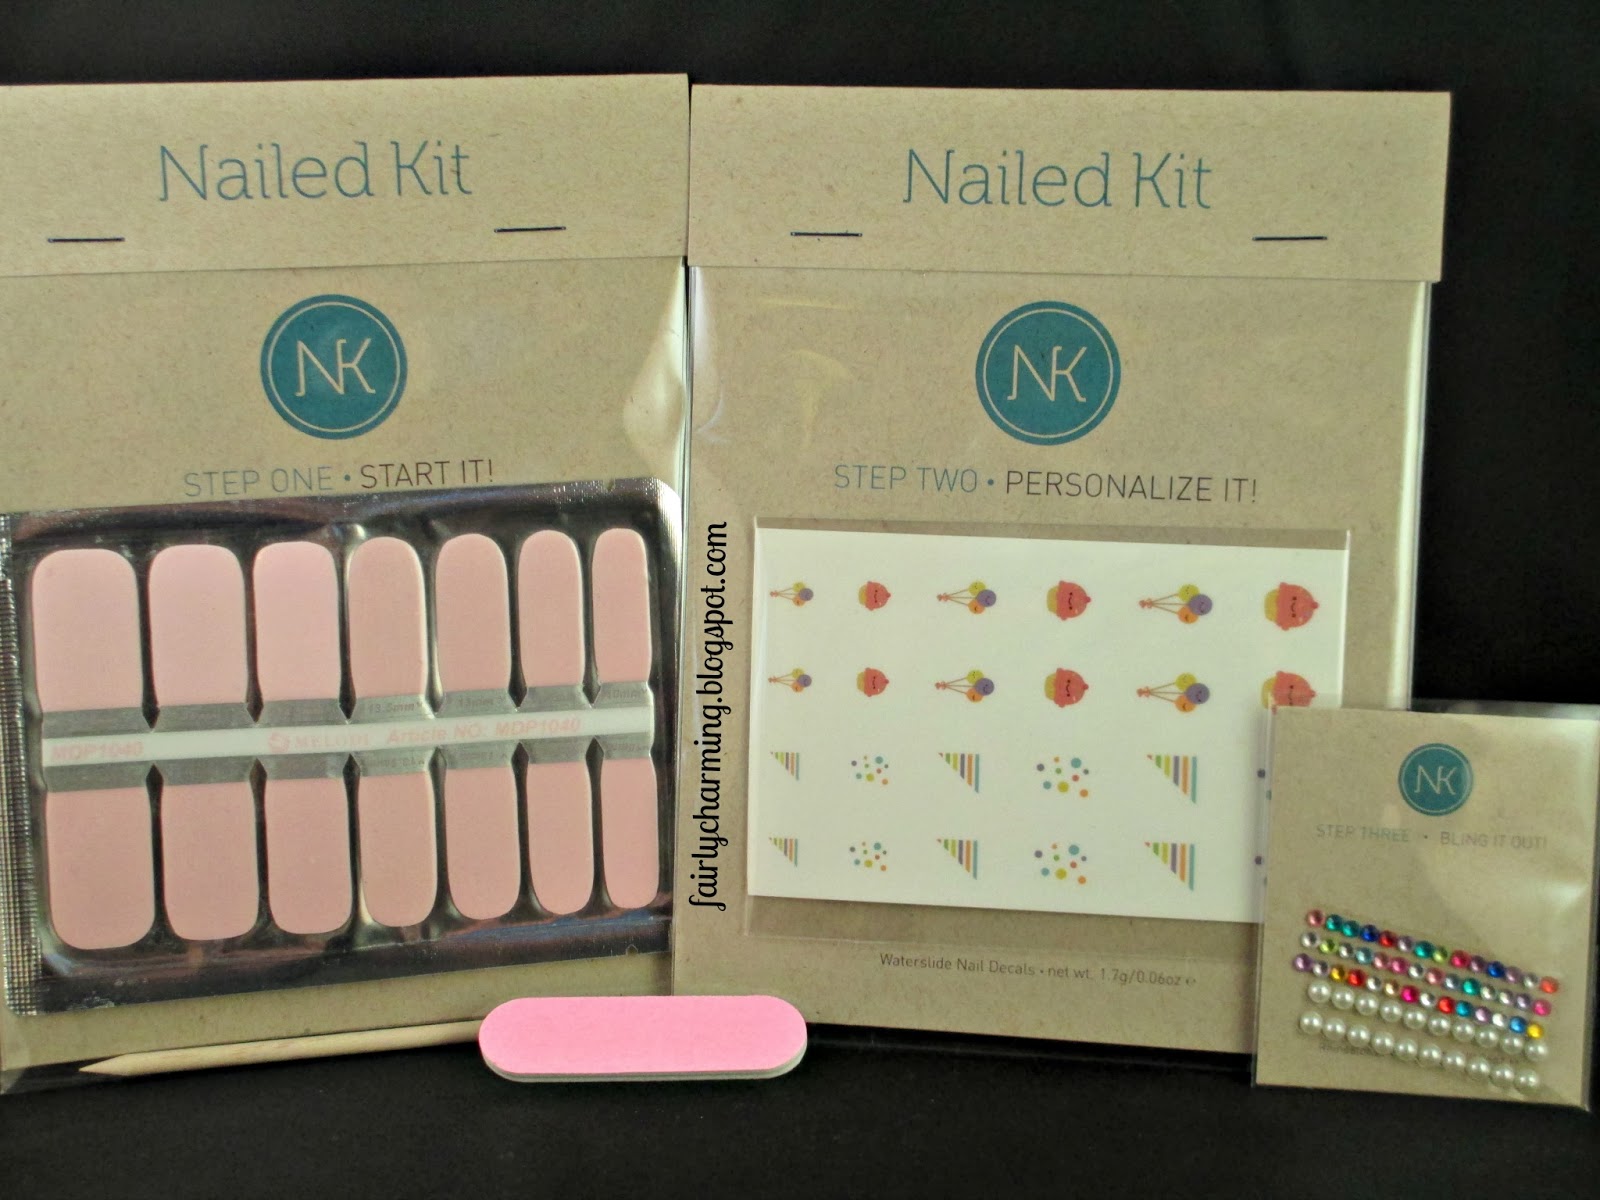
Nailed Kit Is just what it sounds like... A nail art kit!  It includes all of the materials one might need to create some fun/fabulous/adorable nail art.  There are quite a few styles to choose from, but I decided to go with the Cupcake Birthday Kit...

Nailed Kit, DIY nail art, subscription box, birthday, cupcake, all in one, nails, nail polish. nail art, nail design, mani

Inside the kit you will find nail polish strips, water decals, rhinestone/studs, an emery board and an orange stick.  Each packaged item has instructions on the back for application.  It's pretty fool proof... well, excpet for this fool lol.
 
Nailed Kit, DIY nail art, subscription box, birthday, cupcake, all in one, nails, nail polish. nail art, nail design, mani

The instructions for the nail strips said to stretch them over your nails.  Well, these bad boys (girls?) are really pliable and I actually LOVED the way that they looked.  Very much as if I had polished my the nails myself.  But... I was a little over zealous with the stretching and a few minutes later when I was ready to take some pictures, the strips shrunk back a bit and my nail line was peaking thru at the tips.  I'm a big dope!


So I pulled out the closest polish shade I could find (Color Club Endless) and all was right with the world lol.  The other polish pictured, for those who are curious, is Spellbound Nails Upelkuchen (birthday cake batter, I thought it was fitting haha).


I did a second mani I wanted to show the versatility of this box.  Polishes used here were Jesse's Girl Sprink Break, Sally Hansen Blue-Away and Lush Lacquer Clowning Around.  The one recommendation I will make when using this kit... the decals are pretty sheer so a really light base (I chose white) will help the color to pop.


There are so many options with this kit and this company.  You want to throw a nail party?  Awesome!  Get some food and drink and order a few kits for your gal pals... party hardy!  Or maybe it's a baby shower?  A bachelorette party?  They've got you covered.  You can also just buy a kit for yourself and create multiple manicures.  Aaaaand if you just want the cute little decals... you can do that too!  If you really love it, there are subscriptions boxes available as well.  So many choices!!  Nailed Kit is a really great option for anyone who is wanting to take the plunge into nail art :)

You can find out more about Nailed Kit via their website.


What do you guys think about this kind of box?  Let me know in the comments below :)

Until next time!

Stef <3

* This product was provided to me for review.  I received no payment or other compensation for the review of this product.  The opinions stated here are completely my own.  The contents of this review are based on my direct experience with this product.

Friday, October 25, 2013

Kaboom!

Hello, lovelies!

I'm wishing you all a very happy Friday!  I have another vault mani to share with you today :)  This is one that I did over a month ago I think?  I used some new-to-me polishes from Color Club's Fiesta Collection and a polish from Salon Perfect's Neon Collision Collection that came out over the summer...

Color Club Fiesta Collection, Wild Cactus, Sunrise Canyon, Salon Perfect Kaboom, green, teal, lime, tribal, skittle, skittlette, floam dupe, nails, nail art, nail design, mani
 Colors Used: Color Club - Wild Cactus and Sunrise Canyon, Salon Perfect - Kaboom, Daisy Nail Lacquer - White Diamond

A little bit of this and a little bit of that in this skittle mani.  Kaboom is actually a perfect dupe for the ever coveted "Floam", an indie polish that has been discontinued.  Did you ever play with Floam as a child?  I loved the stuff lol.


It's been a while since I did this, so I can't remember how many coats all of this was.  I know that Sunrise Canyon (middle finger) was 3 coats.  I remeber being concerned about streakiness at first, but by the third coat it was golden.  I also remember putting Kaboom over a base of Wild Cactus, but I'm not sure how many coats I used.  Maybe 2?  The tribal print was free-handed using a striping brush.


All in all i like the color combo and it was 3 more polishes to get out of my un-used pile lol.


Slowly but surely my nails are growing.  I'm hoping that their will be a noticeable difference when I start sharing more current nail art with you.  Then again maybe you'll think, "She made a big fuss over this??".  Hahaha we shall see ;)

Until next time!

Stef <3

Wednesday, October 16, 2013

Candy Corn Spooks

Good morning, dolls!

I told myself that I should calm down with the Halloween manis for a little bit.  You know, maybe pull some regular nail art from out of my picture vault?  Yea, no.  That didn't happen lol.  Last night I thought to myself, "Candy corn!".  But it's nail art that has been done... a lot.  heck, I did it last year.  So then I figured I could incorporate those colors without actually doing cany corn.  Right?  Right!


Color Club Almost Famous, Daisy Nail Lacquer White Diamond, Rimmel Black Satin, China Glaze Toe-tally Textured, Sinful Colors Nail Art Time Off, Halloween, candy corn, ghosts, stiches, water decals, nail art brush, striper, yellow, white, orange, black, nails, nail art, nail design, mani
 Colors Used: Color Club - Almost Famous, Daisy Nail Lacquer - White Diamond, Rimmel - Black Satin, China Glaze - Toe-tally Textured, Sinful Colors Nail Art - Time Off

I started with my base colors.  3 coats of Almost Famous. 2 coats White Diamond, 2 coats of Black Satin and 2 coatts of Toe-tally Textured (which I bought on clearance specifically so I could use it for Halloween lol).

 
I used the water decals that I received/reviewed for KKCenterHK and placed my ghosts on my ring finger.  Then I took the Sinful Colors striperand added some stitching to my middle finger.  I threw on some top coat and that's all she wrote ;)


Boo!

The most challenging part of this nail art was finding a good yellow to use.  They are notoriously streaky, which is sad because yellow is one of my all time favorite colors.  Almost Famous is a really great yellow polish, but still... it requires 3 thinnish coats before the streaks are covered *sigh*.  Do you have any yellow recommendations?  I'm on the hunt!  Hahaha...

Until next time!

Stef <3

Friday, September 13, 2013

This Flamingo's Not Sari!

Hello, lovelies!

Today's mani is another simple one because I've been stretched a little thin this week.  I'm fighting to keep my eyes open as I'm typing right now lol.  The creative juices just have not been flowing because I'm so stinkin' tired *sigh*...

Color Club Flamingo, Sephora by OPI I'm So Sari!, pink, teal, glitter, simple, dotticure, accent nail, nail art, nail design, mani
 Colors Used: Color Club - Pink Flamingo, Sephora by OPI - I'm So Sari!, Daisy Nail Lacquer - Diamond White

I did a mini retail therapy session the other day and picked up the Color Club Fiesta Collection.  I've been drooling over photos of this collection for months and finally got around to purchasing them.  And I have not been disappointed!


2 coats of Flamingo and 2 coats of I'm So Sari! over a no name teal polish.  I used a medium and a small sized dotting tool to create the cascading dotticure.  I top coated with Color Club Clear.


I really love the way this one turned out.  I have embraced pink as an acceptable color to be worn on my nails...


Happy Friday y'all!  I hope you enjoy your weekend immensely.... 

Until next time!

Stef <3

Friday, August 23, 2013

Luck Schmuck!

Hiya dolls!

I'm feeling like a bit of a Grinch today.  I'm very glad that it's Friday and I'm very very glad that I get to take the day off of work.  But it's work that has made me slightly cranky.  Not just my school job but my music jobs as well.  Bah-humbug!


Revlon Posh, Color Club Gingerbread, Sally Hansen Green With Envy, nail crystals, nails, nail art, nail design, mani
 Colors Used: Revlon - Posh, Sally Hansen - Green With Envy, Color Club - Gingerbread

They say that green is the color of luck (who are "they" anyway??).  I haven't felt very lucky while wearing this mani but it did last about 4 days, chip-free. Ok...I was a little lucky....


It's 2 coats for each color except Gingerbread, which was 3.  I applied the crystal while the polish was still wet and then topcotaed all of my nails with OPI RapiDry.


 Sometimes simple is nice right?

Happy Friday to you all!  I hope you have a fantabulous weekend :)

Until next time!

Stef <3

Saturday, July 13, 2013

Tealquoise...?

Good morning, dolls!

It's the weekend!  Hallelujah!!  Haha it's just been one of those weeks I suppose.  I plan to do some therapy shopping with my girl, the fashionista, and I can't wait :D  Seeing as I need to start getting ready, let's get to the mani...

I saw a manicure recently where the girl used teal and turquoise as her pallete and absolutely fell inlove with it.  She did some flower stamping that was adorable, but I decided to take mine in a different direction...


Julep Harper, Color Club Edie, Love & Beauty Teal, teal, turquoise, polka dots, stripes, opalescent, glitter, mermaid, nails, nail art, nail design, mani
 Colors Used: Color Club - Edie, Love & Beauty - Teal, Julep - Harper, Sally Hansen - White On

I'm really loving stripes right now and I'm finally getting my striping back into shape.  This means you will probably be seeing a lot of stripey nails up on the blog in the near future ;)

So, both my middle and ring fingers got teal polish to start.  This teal from L&B is actually pretty sheer and need 3 thin layer to build opaqueness.  Middle finger was topped with 2 thin coats of Harper, a super compacted opalescent glitter that makes me think of mermaid scales :) My thumb and pinky got 3 coats of Edie.  She's a little bit streaky but such a beauty!  Striping and polka dots were acheived with they're respective tools...


I only have 2 photos for you today because my camera decided to make my hands look like they were on fire.  They were so ridiculously red before editing and after fixing 2 photos, I was done lol.

I hope you all have an absolutely wonderful weekend filled with joy and fun :D

Until next time!

Stef <3